
# Project: Implementation
## Requirements
See [Project overview page](/~TDDE42/project/index.en.shtml) regarding the
content and layout requirements of the project.
During the review session, you must be able to demonstrate how your
implementation adapts to the following:
- varying size and number of content components (featured articles and secondary
articles)
- three different device sizes
### How the layout adapts to different amounts of content
As per requirements above, your implemented layouts must be able to adapt to
both variations in the number of content elements and the amount of content in
the content elements.
When presenting your project, you should be able to show that your layout
implementation is able to adapt to varying size/number of content elements for
at least two content element types e.g.
- being able to vary the number of featured articles that also have different
amounts of text content and/or image content and
- being able to vary the number of secondary articles that also have different
amounts of text and/or image content
To aid you in testing this, use e.g. the JavaScript provided in the downloadable
project template below. **Note**: You do not have to "integrate" the monkey menu
into your design. It is OK if they just sit on top of the everything as
specified by the included CSS. The buttons are just used for testing your layout
so just pretend they are not there when looking at your page.
### Making changes to your submitted preparation work
You may make changes to the layout you submitted previously, but this should be
documented with an updated wireframe which you should be able to show us when
presenting your project.
## Project review session
The presentation of your project implementations will be similar to the oral lab assignment reviews. During the review session you will have the opportunity to walk around and look at the projects your peers have implemented. The course assistans will be talking to each group separately, where you will be asked to show your project and demonstrate that it meets the requirements.
__Make sure to have your (updated) wireframes at hand as a reference.__
Prepare your presentations so that you cover the following:
- Your starting project idea: show what your plans were
- Your final result: walk us through any changes you made compared to the
original plans, and also demonstrate that your implementation fulfills the
requirements
- Tell us about difficulties you had during in implementing your layouts
- If you have any tips to share with the rest of the group, please feel free to
do so!
## Making up for not attending the project review session
If you were unable to attend the final project review session, submit a screencast via Lisam under __Presentation, deliverable 3: Screencast__. The presentation should cover the points listed above. Make sure to reference your wireframes and compare this with your implementation. The screencast should be no longer than 10-15 minutes, so make sure to make a plan for you presentation before you start recording.
## Deliverables
Submit a zip-file containing your project implementation (all files needed to view your implementation) and a PDF with your wireframes (updated if needed) via Lisam. **Please use your correct group name when submitting (i.e. A1, B3 etc)**.
## Files to download
- [Project template files](project_files.zip)
The zip-file above contains some JavaScript that you can use in your project in
order to add or remove content elements. You can view and try the template files
without downloading [here](template-demo).
You are free to change as much or as little as you want when using the project
template files. In fact, you do not need to use them at all. However, you must be
able to demonstrate how your layout adapts to content variations as specified in
the requirements.
## Testing your layout
The JavaScript in the template files is to help you test how your implemented
layout adapts to different number of content components, and content components
of different sizes.
**Note**: You do not have to "integrate" the monkey menu into your design. It is
OK if they just sit on top of the everything as specified by the included CSS.
The buttons are just used for testing your layout so just pretend they are not
there when looking at your page.
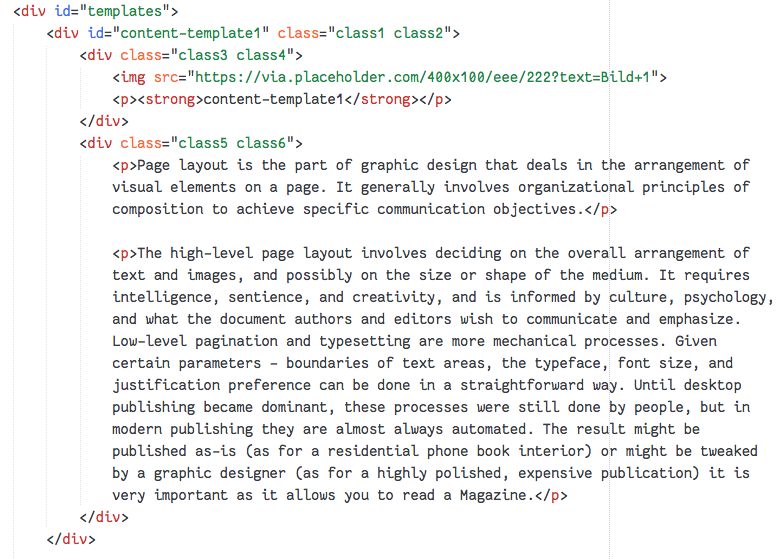
### Template elements
You specify templates you want to be able to add to your web page inside the
`div` with `id="templates"`. Below you can see the first template in the
included `HTML` file. In the included stylesheet, the `"templates"` `div` is
hidden using `display: none;`.
### Buttons that add content
At the top of the `HTML` file, there is a `div` containing buttons that will add
or remove elements from a target `div`.
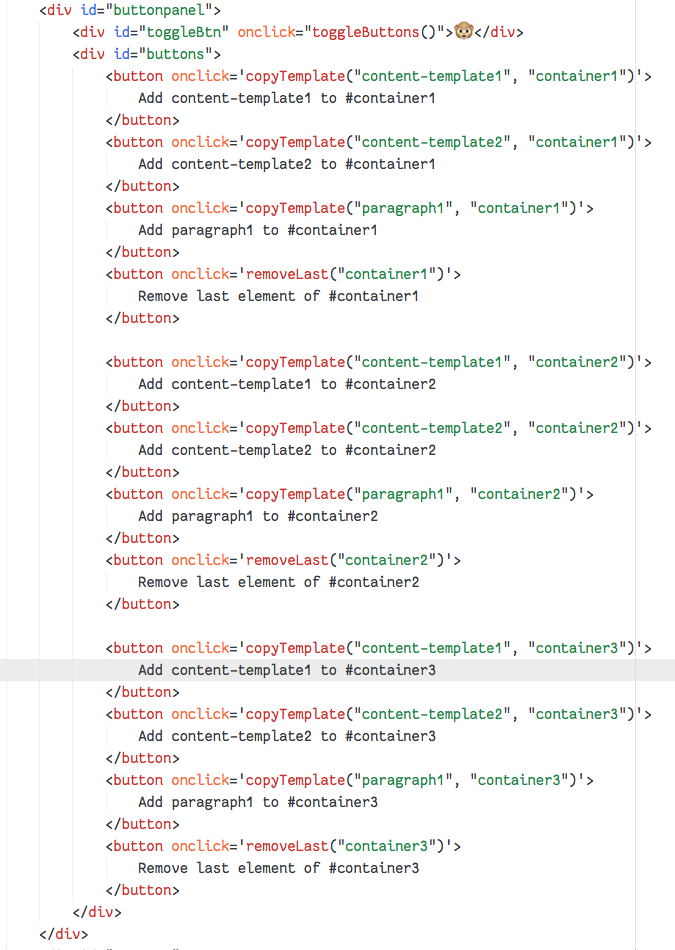
To create a button of your own, just follow the same pattern as the included
example. The important part is the `onclick='copyTemplate("content-template1", "container1")'`.
This tells the button that when it is clicked, it should make a copy of the
element with the `id="content-template1"` and add it as the last element of the
existing element with `id="container1`. Everything except for the `id` of the
template element will be copied to a new element placed last inside the element
with `id="container1"`.
Change `"content-template1` and `"container1` as needed.
### Buttons that remove content
To create a button that removes the last element from a container, add a button
that calls the JavaScript function `removeLast()` as in the image above. The
important part is the `onclick='removeLast("container1")'`.
This tells the button that when it is clicked, it should remove the last child
element of the element with the `id="container1"`. If there are no child
elements, nothing will happen.
Change `"container1"` as needed.
### Hide the buttons
Press on the monkey to show/hide the buttons.
Page responsible: Robin Keskisärkkä
Last updated: 2025-01-14
