
TDDC17 Artificial Intelligence
Lab 1: Intelligent Agents
Aim
The "agent" paradigm has rapidly become one of the major conceptual frameworks for understanding and structuring research activities within Artificial Intelligence. In addition, many software frameworks are being introduced and used both in research and industry to control the complexity of sophisticated distributed software systems where the nodes exhibit behaviors often associated with intelligent behavior.
The purpose with this lab is to introduce the agent concept by allowing you to familiarize yourself with a software agent environment and world simulator. You will program an agent and implement its behaviour to provide cleaning capabilities in the vacuum cleaning world. The behaviour will then be compared to some simple reference agents.
Preparation
Read chapter 2 in the course book. Pay particular attention to section 2.3 (agent environments) and section 2.4 (different agent types). After this, read this lab description in detail.
Lab assignment
Your assignment is to construct a vacuum agent. The agent should be able to remove all the dirt in a rectangular world of varying size with a random distribution of dirt. When the world is cleaned the agent should return to the start position and shut down.Lab system
Since recently two alternative implementations of this lab are provided: Java and Python. Note this pertains only to Lab 1. The Java implementation of this lab has been used and refined for many years and is still the default version. In contrast, the Python implementation is completely new and less extensively tested. If you choose to use Python, please report any problems you detect to Mariusz. The Python implementation is very close to the Java version both in terms of code structure and provided GUI, i.e. you can follow the same instructions below although they mostly refer to the default Java implementation.
The lab system consists of the environment simulator and the agent. You are given a simple example of a vacuum cleaner agent called
MyVacuumAgent.java here (in Python: myvacuumagent.py - here). What you have to do is
to improve on the code controlling the behaviour of the agent to make it perform better.
The description of how to set up and run the code is available towards the bottom of the page.
The environment simulator
You can test your agent in the simulator GUI program. The simulator loads an agent (yours will be implemented in- The agent perceives the world
- The agent decides on an action
- The action is executed
The implementation of the simulator
The simulator supplied for this lab is based on the AIMA-Java/AIMA-Python framework but it is not identical to the original version available on the web.The interface
Basically the agents may perceive dirt or obstacles in the squares, and they can act by moving between the squares, and removing dirt.
Percepts
A percept for the vacuum-agent consists of three values:bumpequal totrueif the agent has bumped into an obstacle, elsefalse.dirtequal totrueif the current square contains dirt, elsefalse.homeequal totrueif the agent is at the start position, elsefalse.
Boolean values are obtained with the following code located in the execute method of an agent:DynamicPercept p = (DynamicPercept) percept;Boolean bump = (Boolean)p.getAttribute("bump");Boolean dirt = (Boolean)p.getAttribute("dirt");Boolean home = (Boolean)p.getAttribute("home");Similarly in Python implementation those values are obtained with the folowing code:
bump = percept.attributes["bump"]dirt = percept.attributes["dirt"]home = percept.attributes["home"]Note that this is the only data that the agent gets from the simulator.
Output
In Java the output from the agent's program (return value) is one of the following actions:LIUVacuumEnvironment.ACTION_MOVE_FORWARDmoves the agent one step forward depending on its direction.LIUVacuumEnvironment.ACTION_TURN_LEFTmakes the agent turn left.LIUVacuumEnvironment.ACTION_TURN_RIGHTmakes the agent turn right.LIUVacuumEnvironment.ACTION_SUCKcleans the dirt from the agent's current location.NoOpAction.NO_OPinforms the simulator that the agent has finished cleaning.
ACTION_FORWARD, ACTION_TURN_LEFT, ACTION_TURN_RIGHT, ACTION_SUCK, ACTION_NOP, respectively.
GUI
The provided environment simulator application is presented in Figure 1.
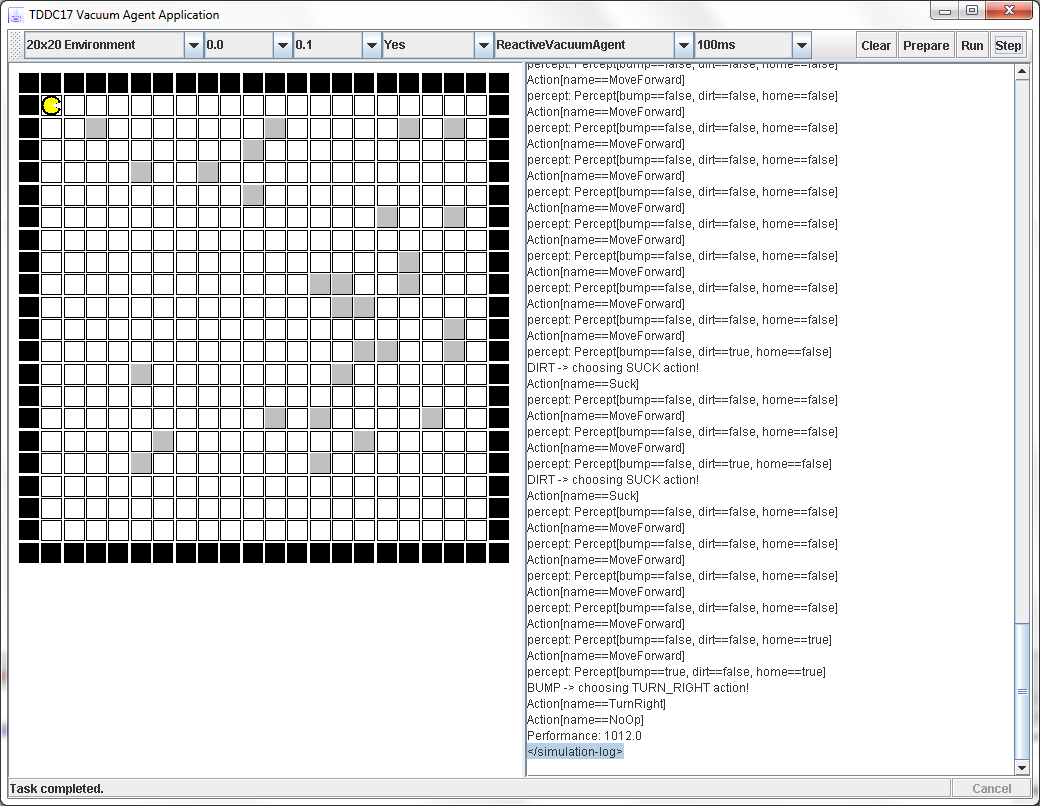
The main window of the application is divided into two parts: the environment visualization pane on the left and the text output pane which displays the redirected System.out in Java and self.log in Python. Certain messages from the simulator are printed in this pane but it is also useful to debug your agent's code.
In the environment pane the black squares represent obstacles. Trying to move an agent into an obstacle results in perceiving the bump equal to true. The grey squares represent the dirt. Moving into such a square results in perceiving the dirt equal to true. The graphical representation of the agent visualizes its current direction.
The following drop down menus are available to set the simulation parameters (from left):
Environment sizecan be set to5x5,10x10,15x15,20x20,5x10, and10x5. Your agent should not be tailored to any specific size, though for conveniance you can assume a maximum size of20x20.Hinder probabilityindirectly specifies the amount of obstacles in the environment (it should be set to 0.0 and 0.1, in Tasks 1 and 2 respectively).Dirt probabilityindirectly specifies the amount of dirt in the environment.Random environmentspecifies whether a new environment should be generated for every run. This function is useful to test an agent in the same environment several times.Type of agentlists the available agent type classes. The first on the list is the agent you will modify.Delayspecifies the delay between each simulation step.
The following buttons are available (from left):
Clearcleans the text output pane.Preparegenerates a random environment based on the selected parameters.Runstarts the simulation.Stepallows for performing one step of the simulation at a time. Make sure to executePreparefirst.Cancelterminates the simulation.
Program
The interesting part of the agent is theexecute method. It is a
function that takes a percept as input and returns an action as
output.
The simulator computes what the agent can perceive (a percept),
applies the function (your program) to the percept,
and executes the resulting action. Note (again) that the agent has no
authorization to change the world directly, for example via some
global reassignment.
As you can see from the definitions in the source code, the RandomVacuumAgent and ReactiveVacuumAgent (in Java - here, in Python - here) do not remember what they have done and experienced. If we want the agent to have a memory we have to
store information "inside" the agent.
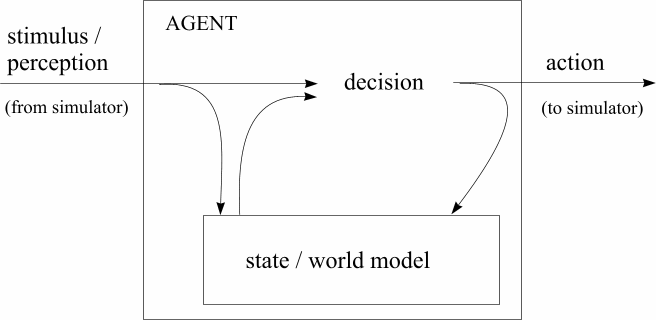
Figure 2: Agent with internal state
Scoring
The performance of an agent is measured by a score. The initial score of the agent is -1000, and for each action the score is changed. Sucking up dirt increases the score 100 points, while shutting down at the starting square gives it 1000 points. All other actions decrease the score by one point.Running the Lab environment
You can choose either of the two following lab setups, depending on if you want to use a pre-packaged Eclipse environment or your own favorite editor. If you are unsure, go with Eclipse. Note, the general information about working on this lab remotely can be found here.
Java Eclipse version (RDP, ThinLinc or on campus)
- To prepare the local files run the following commands in the terminal:
mkdir TDDC17_lab1; cd TDDC17_lab1cp -r /courses/TDDC17/labs/lab1_workspace/ .
- Setup and start the Eclipse editor:
- To add the Eclipse editor to your environment execute the following command in the terminal:
module add prog/eclipseor alternativelymodule initadd prog/eclipseto always add it when logging in - note that you will need to open a new terminal window for the command to take effect the first time. If eclipse is still not available (next step) - try to force the current available version by usingmodule add prog/eclipse/2024-06/2command instead. eclipse
- To add the Eclipse editor to your environment execute the following command in the terminal:
- When the eclipse editor asks for a path to the workspace choose the lab1_workspace folder which you copied in step 1.
- Click Continue if you get an Older Workspace Version warning.
- Right-click on the project and select refresh.
- The Eclipse editor will compile the java files automatically. You can start the lab by using the dropdown menu on the run button (green circle with a white triangle/play symbol). You may have to select "LIUVacuumAgent" in the drop-down menu.
Java console version (RDP, ThinLinc or on campus)
- To prepare the local files run the following commands in the terminal:
mkdir TDDC17_lab1; cd TDDC17_lab1mkdir lab1; cd lab1cp -r /courses/TDDC17/labs/lab1_workspace/project/* .
- To compile the required local classes:
./compile
-
Now you can run the simulation environment GUI:
./start
Python version (console and PyCharm; RDP, ThinLinc or on campus)
- To prepare the local files run the following command in the terminal:
cp -r /courses/TDDC17/labs/TDDC17_lab1_python/ .
- Console: to run the code execute the following command in the TDDC17_lab1_python directory:
python3 run_lab1.py
- PyCharm: setup and start the PyCharm editor:
- To add the PyCharm editor to your environment execute the following command in the terminal:
module add prog/pycharm-professional/2024.2or alternativelymodule initadd prog/pycharm-professional/2024.2to always add it when logging in - note that you will need to open a new terminal window for the command to take effect the first time. pycharm.sh- After starting the PyCharm editor, open the project by selecting File/Open and choose the TDDC17_lab1_python directory.
- To execute run
run_lab1.pyfile - open the file in the editor, right click and choose Run run_lab1.
- To add the PyCharm editor to your environment execute the following command in the terminal:
Running it on your personal computer
You can download the Eclipse compatible workspace here: .zip file. Simply extract the file and point Eclipse to it during the start-up ("Select a directory as workspace") and follow the general instructions above. If you do not have Eclipse installed it is recommended that you download a version suitable to your platform here.The Python code is available here. You can use your editor of choice (e.g. PyCharm) and follow the instructions above. Note, the lab code requires Python version lower than 3.10 and depends on three additional modules: numpy, tkinter and ipython.
Installation of Python and running the lab on Windows computers:
- Install a Python distribution which can be downloaded here.
- Open Command Prompt application. Install additional Python packages required by executing following command:
pip install numpy ipython
cd C:\Users\YOUR_USER_NAME\AppData\Local\Programs\Python\Python38-32\Scripts
- Start IDLE (Python Shell) application and open run_lab1.py file which can be found in the downloaded zip file. Press F5 to run the module. Alternatively, you can use other editor of your choice e.g. PyCharm.
In some cases when running the Python version of the lab on MacOS, the graphics may not be displayed properly. If that is the case, you can download an alternative version of the code here.
Detailed Lab Task Description
Play around with the GUI and try the different options and agents.
- Using
MyVacuumAgent.java(ormyvacuumagent.py) as a template implement an agent with an internal state that helps the agent clean more effectively/efficiently than the reactive/random agents. Note that an example of an agent with a simple state representation is provided (very limited - it only moves forward and sucks dirt) that you may modify in any way you wish. The agent must be able to suck up all dirt in a rectangular world of unknown dimensions without obstacles and shut down on the home position (home position can be sensed through one of the percepts). At the end the agent should also have a fully updated world model (i.e. world variable in MyAgentState class in Java or self.world in Python). Note: The agent starts from a random location which is achieved by executing moveToRandomStartPosition() method in the MyvacuumAgent file (move_to_random_start_position in Python). You should not change this part of the code. In Java you can use the already mentionedcompilescript to compile your changed agent (or use Run if you are using the Eclipse editor, files are compiled automatically when changed). In Python simply editmyvacuumagent.pyfile and run the lab again. Evaluate the performance of the agent. In what ways is it better or worse than the reactive agent? - In this task you will extend and improve your agent to be able to solve the problem with obstacles (0.1 obstacle density, 15x15 world). This can be achieved in a variety of ways with different levels of complexity (e.g. rule-based, search). Returning to the home position is not strictly required, but encouraged. It is sufficient that the agent performs a predefined minimum number of steps (set iterationCounter - Java, self.iteration_counter - Python variable to e.g. [width x height x 2]) before shutting down. Prepare to discuss during the lab demonstration in what way you have improved the agent to handle obstacles. Note: If you are already familiar with search algorithms, feel free to implement an agent based on search which shuts down at the home position after all the dirt is cleaned. In that case the iterationCounter should be set to a large enough value so that the agent is able to finish the task.
- Write explanations of how your agent works (in both Task 1 and 2), what is the main decision-"loop", some notes about what data you store in your agent, and why you have chosen your solutions, if there were alternatives etc. This should add up to a report of approx. 1-2 A4s. Commented or easily readable code is also required.
How to report your results
Demonstrate the lab to the lab assistant and hand in the code as well as the report from Task 3 according to the submission instructions.
Page responsible: Fredrik Heintz
Last updated: 2024-09-04
