
Lab 5: Motion Planning
Introduction
In this lab you will use a graphical environment to test different motion planning techniques. You will use OMPL, the Open Motion Planning Library, which comes both for integration into existing projects as well as with a graphical interface to visualize planning. More information about OMPL can be found on the OMPL homepage via the link below.
Updates and Known Problems
Any problems discovered during the lab, and any clarifications we make to
the lab instructions, will be announced here.
Resources
The following resources are available:
- OMPL homepage - here you can find all available informaion on OMPL.
- GUI description - Getting started with the GUI.
- OMPL primer - this pdf contains a concise introduction to OMPL. It goes through some theory behind motion planning and how to get started with OMPL.
Running OMPL
The graphical interface to OMPL, called OMPL.app, is started by executing
module add courses/TDDD48
ompl
This loads a Singularity container (similar to Docker) which contains the
entire OMPL environment including the GUI. Note: This may only work
via Thinlinc to thinlinc.edu.liu.se, due to how it is set up by
LiU-IT.
To run OMPL from home you have two options. Either install it locally or
run it remote via Thinlinc.
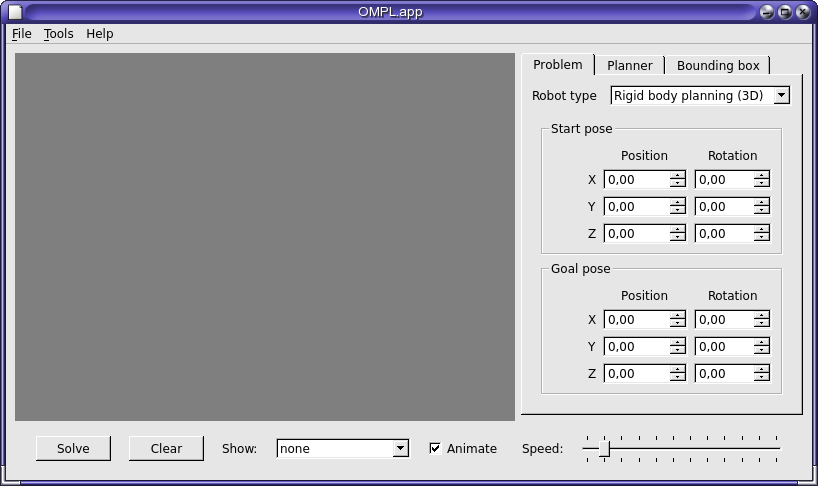
When you start OMPL.app which is the graphical interface of OMPL you will
see something like this:
Lab 5.1 Theory: Spaces and robots
The answers to the questions in the theory part should be motivated and
included in your final report.
- What is the difference between Configuration Space and Work
Space?
- Which one is used when searching for a plan? Why is it used?
- What are the formal requirements for a robot to be considered
holonomic?
Lab 5.2: Comparing Planners
In this part we will take a look at some different types of motion
planners and compare their approaches. For simplicity we will use 2D maps
and robots. The gui always renders the image in 3D, but this simply makes
2D map "thicker".
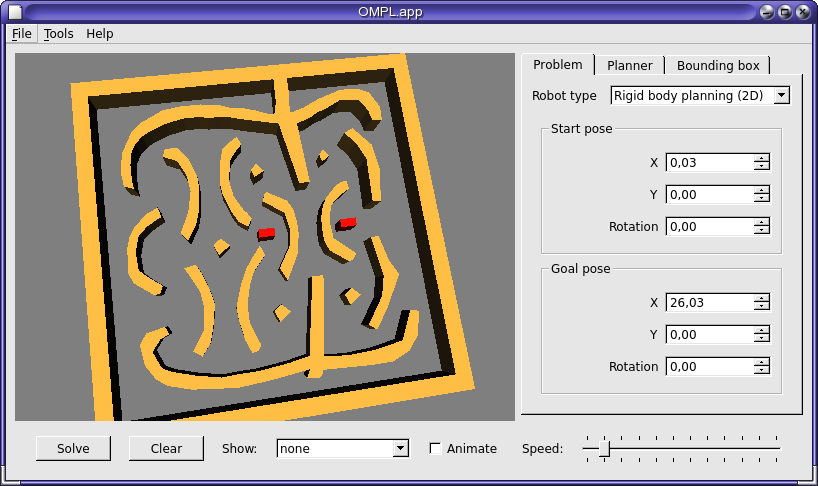
Start OMPL.app. Switch to 2D planning by setting "robot type" to "Rigid
body planning (2D)". Here, "rigid" means that the robot does not change
shape.
OMPL comes with many resources in the form of maps and robots. We will
now load some resources that are found
in /usr/local/share/ompl/resources/2D. These are only
visible from within OMPL.app, since they are inside the Singularity
container! That is, if you try to see them from a command line window,
they will not be there.
Open the environment Maze_planar_env.dae. Then open the
robot hook_planar_robot.dae. This map is relatively complex for
the planner and the robot is also increasing the complexity by its form
and size, though it is otherwise equivalent to the ladder problem from the
lectures. Note that you can zoom in/out with the mouse wheel and if
needed, rotate the map by dragging the mouse while holding a button
pressed.
Now you need to select your start and goal configurations. These are set
using the GUI controls in the "problem" tab to the right. You can choose
your own configurations including rotation angles.
Now, go to the "planner" tab and select the RRTStar planner. This is an
RRT planner, using rapidly exploring random trees -- another form
of probabilistic sampling planner that explicitly generates a tree in the
(possibly many-dimensional) configuration space. Once it has generated a
solution, it continues to optimize the generated tree, iteratively finding
better and better paths.
Click "solve" in the bottom left corner to get your first plan in
OMPL. After a plan is found you can choose to have it animated step by
step or shown. You can also show states and edges between states to see
which states and paths the planner generated.
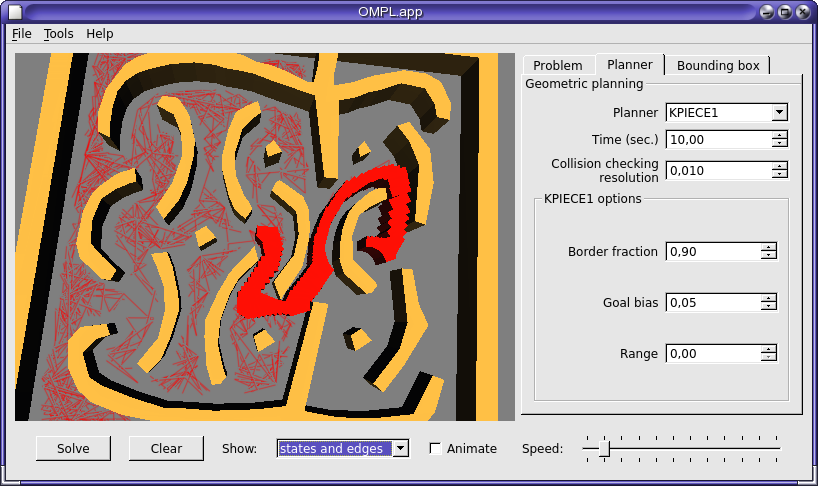
Also try one or more of the PRM planners, and make sure you
visualize the states (nodes) and edges that are generated. Note that not
all aspects of nodes are shown -- only x/y positions, not the rotational
angle of the hook "robot". One reason why there may not be nodes or edges
close to the wall is that in such nodes, the actual robot would extend
into a wall!
For the rest of the lab, select at least one more map which you
think will capture another aspect of motion planning. For example, it may
be a map that still has a few obstacles but has larger open areas than the
original one. Then use the
following information
to select at least one more planner in addition to RRTstar and PRM.
Then run all selected planners on your selected problems/maps.
In the report, show which planner you have chosen.
Describe in your own words how the PRM planner works in general,
according to what we discussed during the lectures (for example, what
happens during preprocessing / during actual planning). Also provide
a very general description of how RRTStar and the other
selected planner works ‐ it's sufficient to provide 2 or 3
sentences about the general underlying ideas.
Also, report your findings when it comes to plan
quality (length), the number of generated states and the amount of time
used by the planner. Planner
statistics can be found in the log window, started via Tools->Log window
or CTRL+1. It is important that you add screenshots (with states
and edges selected and without animations) to the report so that the lab
assistant can follow your reasoning. Note that random planners will
generate different plans each time so remember to screenshot before you
move on. Finally, save the final paths generated for each planner (your
home folder is accessible from OMPL.app even when it runs inside a
container) and calculate the distance moved and the total rotation done
by running the distance calculator
python script on the path file.
Introduction
In this lab you will use a graphical environment to test different motion planning techniques. You will use OMPL, the Open Motion Planning Library, which comes both for integration into existing projects as well as with a graphical interface to visualize planning. More information about OMPL can be found on the OMPL homepage via the link below.
Updates and Known Problems
Any problems discovered during the lab, and any clarifications we make to the lab instructions, will be announced here.
Resources
The following resources are available:
- OMPL homepage - here you can find all available informaion on OMPL.
- GUI description - Getting started with the GUI.
- OMPL primer - this pdf contains a concise introduction to OMPL. It goes through some theory behind motion planning and how to get started with OMPL.
Running OMPL
The graphical interface to OMPL, called OMPL.app, is started by executing
module add courses/TDDD48 ompl
This loads a Singularity container (similar to Docker) which contains the entire OMPL environment including the GUI. Note: This may only work via Thinlinc to thinlinc.edu.liu.se, due to how it is set up by LiU-IT.
To run OMPL from home you have two options. Either install it locally or run it remote via Thinlinc.
When you start OMPL.app which is the graphical interface of OMPL you will see something like this:
Lab 5.1 Theory: Spaces and robots
The answers to the questions in the theory part should be motivated and included in your final report.
- What is the difference between Configuration Space and Work Space?
- Which one is used when searching for a plan? Why is it used?
- What are the formal requirements for a robot to be considered holonomic?
Lab 5.2: Comparing Planners
In this part we will take a look at some different types of motion planners and compare their approaches. For simplicity we will use 2D maps and robots. The gui always renders the image in 3D, but this simply makes 2D map "thicker".
Start OMPL.app. Switch to 2D planning by setting "robot type" to "Rigid body planning (2D)". Here, "rigid" means that the robot does not change shape.
OMPL comes with many resources in the form of maps and robots. We will now load some resources that are found in /usr/local/share/ompl/resources/2D. These are only visible from within OMPL.app, since they are inside the Singularity container! That is, if you try to see them from a command line window, they will not be there.
Open the environment Maze_planar_env.dae. Then open the robot hook_planar_robot.dae. This map is relatively complex for the planner and the robot is also increasing the complexity by its form and size, though it is otherwise equivalent to the ladder problem from the lectures. Note that you can zoom in/out with the mouse wheel and if needed, rotate the map by dragging the mouse while holding a button pressed.
Now you need to select your start and goal configurations. These are set using the GUI controls in the "problem" tab to the right. You can choose your own configurations including rotation angles.
Now, go to the "planner" tab and select the RRTStar planner. This is an RRT planner, using rapidly exploring random trees -- another form of probabilistic sampling planner that explicitly generates a tree in the (possibly many-dimensional) configuration space. Once it has generated a solution, it continues to optimize the generated tree, iteratively finding better and better paths.
Click "solve" in the bottom left corner to get your first plan in OMPL. After a plan is found you can choose to have it animated step by step or shown. You can also show states and edges between states to see which states and paths the planner generated.
Also try one or more of the PRM planners, and make sure you visualize the states (nodes) and edges that are generated. Note that not all aspects of nodes are shown -- only x/y positions, not the rotational angle of the hook "robot". One reason why there may not be nodes or edges close to the wall is that in such nodes, the actual robot would extend into a wall!
For the rest of the lab, select at least one more map which you think will capture another aspect of motion planning. For example, it may be a map that still has a few obstacles but has larger open areas than the original one. Then use the following information to select at least one more planner in addition to RRTstar and PRM. Then run all selected planners on your selected problems/maps.
In the report, show which planner you have chosen. Describe in your own words how the PRM planner works in general, according to what we discussed during the lectures (for example, what happens during preprocessing / during actual planning). Also provide a very general description of how RRTStar and the other selected planner works ‐ it's sufficient to provide 2 or 3 sentences about the general underlying ideas.
Also, report your findings when it comes to plan quality (length), the number of generated states and the amount of time used by the planner. Planner statistics can be found in the log window, started via Tools->Log window or CTRL+1. It is important that you add screenshots (with states and edges selected and without animations) to the report so that the lab assistant can follow your reasoning. Note that random planners will generate different plans each time so remember to screenshot before you move on. Finally, save the final paths generated for each planner (your home folder is accessible from OMPL.app even when it runs inside a container) and calculate the distance moved and the total rotation done by running the distance calculator python script on the path file.
If the planner takes considerably longer time than allowed by the time limit it may have crashed. Therefore, it is always a good idea to check the output in the log window.
Note: With two maps and three planners you will have at least 6 results to dicsuss in the report.
Finishing and handing in the results
Hand in your results:
- Make sure everything is checked in and pushed to the Gitlab project you were assigned: All files, problem files and problem generators you have created or modified, clearly named, as well as the report as a simple text file or as a PDF or Markdown document.
- Then add a submission in the hand-in issue tracker. There is no need to generate zip files; simply provide a link to your repo.
Your assistant may ask you questions or ask for a Zoom meeting in case additional information is required.
