
Assignment 3
The third lab assignment in this course contains six separate exercises that will introduce you to interaction programming techniques you can use as the building blocks.
Submit your completed assignment by the deadline. Submission instructions can be found on the main assignment page.
Learning outcomes
After this lab assignment, you should have gained knowledge about the following:
- How to select elements from the DOM
- How to manipulate an element’s attribute values
- How to manipulate an element’s inline CSS and classes
- How to create new elements in the DOM
- How to animate transitions
Important note: Since the purpose of this assignment is to deepen understanding of the basics of vanilla JavaScript, no outside libraries or frameworks are allowed beside Anime.js when specified by the assignment.
Assignment points
Exercises 2, 3 and 6 have an optional task.
- 1 point: Complete all required tasks and one optional task.
- 2 points: Complete all required tasks and at least two optional tasks.
General assignment instructions
- The mockups images should be seen as sketches. You do not need to recreate the styling of the widgets.
- Use Eric Meyer’s CSS reset.
- Write your JavaScript in a separate file. I.e. not inside you HTML file.
- Do not use the HTML event attributes (e.g.
onclickto define event handlers. Define your event handlers in your JavaScript code.
Create a directory for the assignment and a subdirectory for each exercise.
Exercise 1 - Run script when DOM has loaded
This exercise has no optional tasks.
Required task
Create a web page with a single, centered, blue square in the middle of the page.
Using JavaScript, make the square disappear when the mouse moves on top of it. It does not have to reappear when the mouse moves “out”.
Load your JavaScript in from a script tag in the document <head>. Since you load your JavaScript before the document <body>, you will need to wait for the event DOMContentLoaded before doing anything:
document.addEventListener('DOMContentLoaded', (event) => {
  // your code here
});
Exercise 2 - Using information from an option list element
This exercise has an optional task.
- One optional task in total must be completed to score 1 point.
- Two optional tasks in total must be completed to score 2 points.
The web page for exercise 2 is a page where the user uses a drop-down list to select the number of squares to be displayed in centered line. See image below.
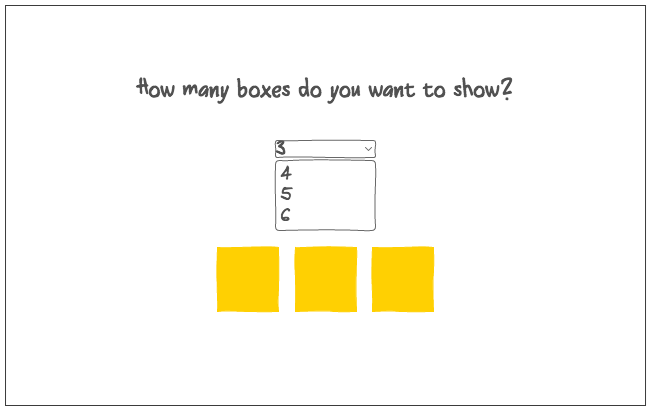
Required task
- Create a web page with a form containing the drop-down list and five squares
(empty
div-elements). The available option values should be the numbers 0-5. - Add an event handler that listens to the
selectelement and shows or hides boxes so that the total number of visible boxes matches the selected value.
Optional task 1
- Make a copy of the web page you created for the basic difficulty level and create a new JavaScript-file. Also, increase the number of options in the drop-down list from 0-5 to 0-16.
- Remove the existing boxes below the drop-down option input from your HTML-file.
- For the advanced level, rather than showing or hiding existing boxes, you should create and delete boxes from the DOM depending on the selected value. (It’s up to you whether you want to delete all boxes at once and then create the correct number of new boxes, or create/delete boxes one by one until the correct number of boxes is shown. The latter is generally better, but slightly more complex to implement.)
Exercise 3 - Adding text with class
This exercise has an optional task.
- One optional task in total must be completed to score 1 point.
- Two optional tasks in total must be completed to score 2 points.
In exercise 3, you will use keyboard events to monitor a text area and make changes to text on the web page. The user should also be able to change the style of the text. See wireframes below.
Required task
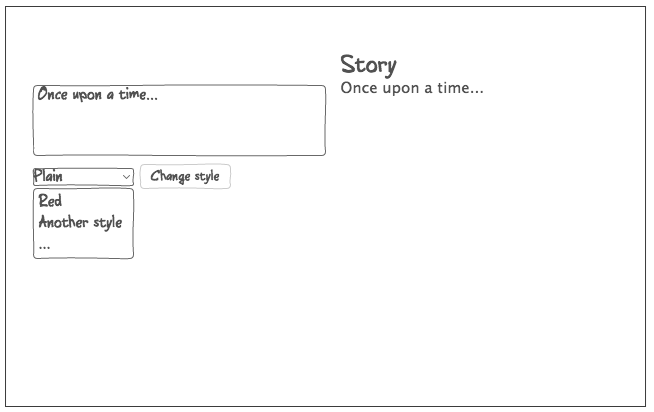
- Create a web page according to wireframe above. The web page should have a
text area with a drop-down list and a button below it, and a
divwith the headingStoryabove it to the right of it. - Implement the following page functionality using JavaScript:
- When the user enters text into the text area to the left, the corresponding text should appear in the right
div. - When the user presses the
Change Stylebutton below the text area, the selected typographic style should be applied to to the current text in the rightdiv(you can make up your own style names and decide its attributes). - Applying a style should be implemented by defining the a class with that style in your CSS and setting the class of the current paragraph to that style.
- The content of the text area should always be reflected in the current paragraph.
- When the user enters text into the text area to the left, the corresponding text should appear in the right
Optional task 2

In addition to the basic difficulty level, the following functionality should be added:
- Add an additional button labeled
New Paragraphbelow the text area. Pressing this button adds a new paragraph to thedivto the right. - The new paragraph becomes the active paragraph. Old paragraphs cannot become active paragraphs.
- Only the active paragraph is affected by style changes.
Exercise 4 - Manipulating CSS properties
This exercise has no optional tasks.
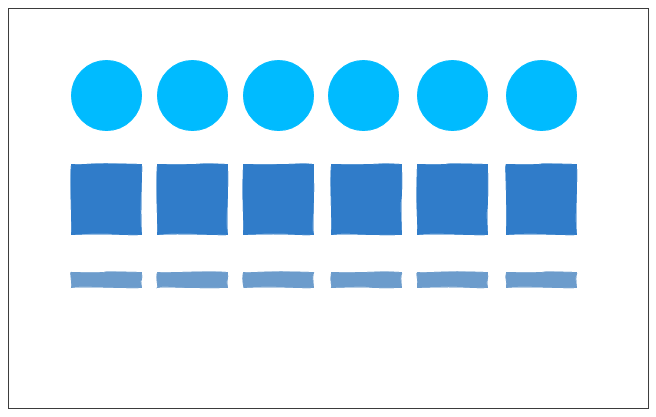
The aim of the fourth exercise is to practice different kinds of CSS manipulation.
Use the files found here: assignment3/a3e4.zip. The HTML file references the file script.js. Create this file and write your JavaScript there.
Required task
All the following should be completed.
- When the user clicks on a circle, the class
.greenshould be toggled (remove from the class list if present, add if not). - When the user clicks on a square, the square should be resized to half its current size, i.e. clicking a square always changes the size of the square.
- When the user clicks on a rectangle, it should move down
10pxfrom its current position, i.e. a rectangle should always move down10pxwhen clicked.
Tip: Use window.getComputedStyle() to get the current style of an element. You can then get e.g. the height or width from that CSSStyleDeclaration object.
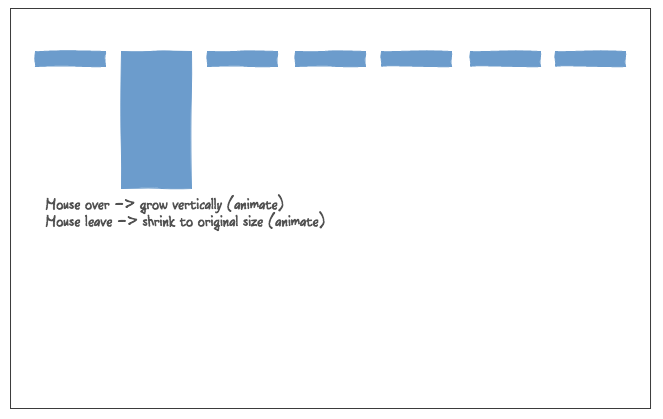
Exercise 5 - Animation using Anime.js
This exercise has no optional tasks.
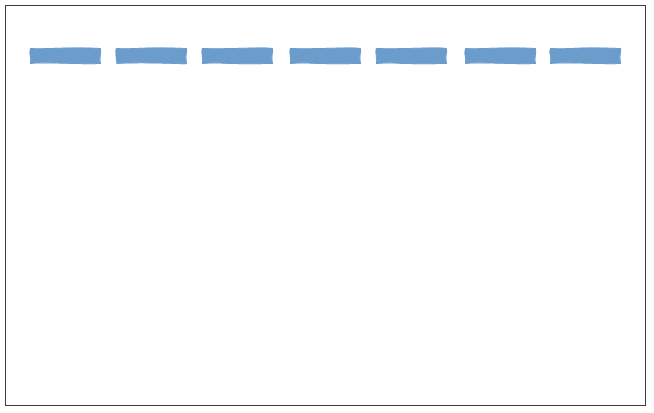
In exercise 5 you will learn how to initiate and cancel animated CSS changes. Use the files found here: assignment3/a3e5.zip
You can import the animate function (and any other submodules from anime.js) straight into your code by using the following import statement at the top of your JavaScript file:
import { animate } from 'https://esm.sh/animejs';
When including a .js-file with such import statements into an html-file you need to explicitly specify that the .js-file in question should be treated as a module by setting the type attribute to "module" like this:
<script src="script-with-imports.js" type="module"></script>
Required task
- When the mouse is over any single rectangle, it starts to grow downwards until it reaches a certain size (you decide).
- As soon as the mouse leaves any single rectangle, it stops growing and starts to shrink to its original size.
- Any new animation on an element should replace any ongoing animation on that element.
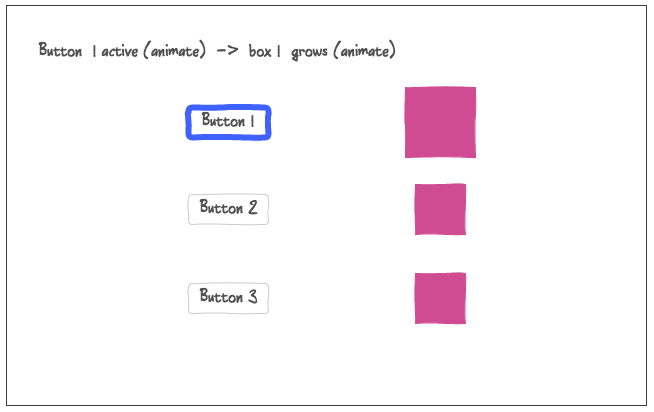
Exercise 6 - Putting everything together
This exercise has an optional task.
- One optional task in total must be completed to score 1 point.
- Two optional tasks in total must be completed to score 2 points.
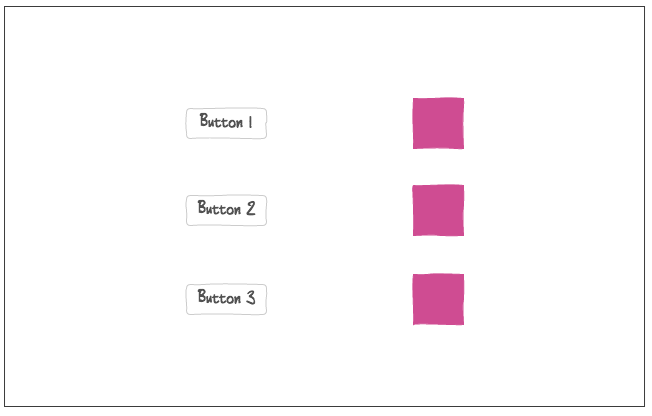
Required task
Create a web page that reproduces the layout above, then implement the following functionality:
- Each button should be connected to a box
- When the user clicks a button, two things happen:
- the corresponding box changes its size using an animated transition
- the button is marked visually as being activated, also using an animated transition
- When the user clicks another button, any previously activated button and box reverts to their original appearance, also using animated transitions.
Optional task 3
Implement all functionality of the basic difficulty level and add the following:
- Add a slider that is used to set the opacity of the square connected to the activated button. The square should retain the set opacity when another button is pressed.
- When a button is activated, the slider is set to the connected square’s opacity level.
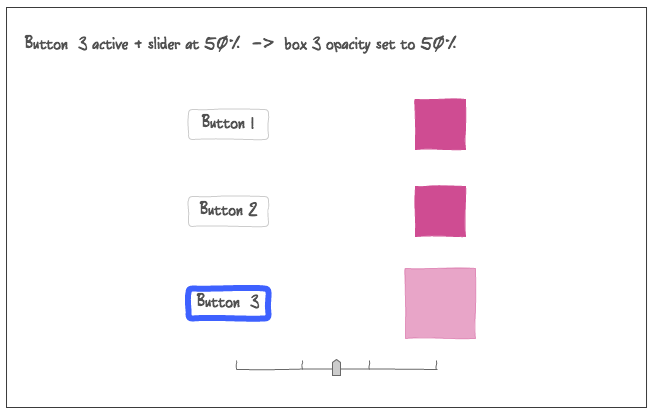
Note: It is not necessary to replicate the tick marks on the slider.
Page contact: Johan Falkenjack
Last update: 2022-11-22