Distance Vector Routing
|
| By Farrokh Ghani Zadegan and
Niklas Carlsson, August 2011 (Based on an assignment by Juha Takkinen) |
Contents
This assignment consists of four tasks: design, implementation, test and demonstration of a program in Java that implements a distributed and asynchronous distance vector routing protocol, based on the Bellman-Ford equation. The solution should include the "Poisoned Reverse" technique, which solves the problem of looping in routing topologies. You will also answer a supplementary question about this lab.
Important note: Before starting to do the coding for this assignment,
you need to
|
The main challenge in this assignment is that your code must be asynchronous. For this assignment you will use an event-driven simulator that manages communication between routers. You should implement the part of the algorithm which is executed in each router. Although routers are active in the same program (simulator), they can only communicate with each other by sending messages through the simulator.
For this assignment you will use the following files (which can be downloaded from here):
After extracting the above archive, a Test folder is also created which contains two versions of the simulator that can be used to test your code:
|
|
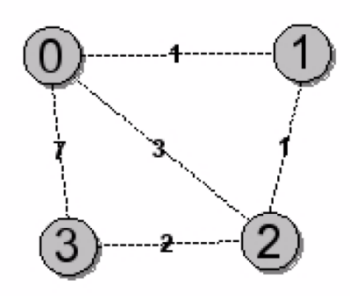
| Figure 1: Network with four nodes in RouterSimulator4.java |
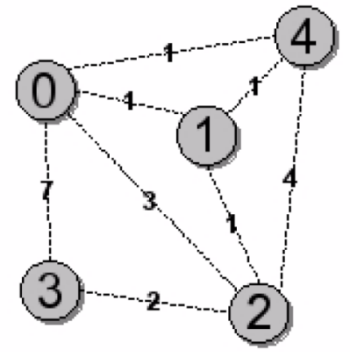 |
| Figure 2: Network with five nodes in RouterSimulator5.java |
For this assignment, you should only add code to the RouterNode.java file. For testing your implemented code (in RouterNode.java), you may also need to (slightly) modify the code in the RouterSimulator.java. You can use the F class in the F.java file to perform simple formatted text output.
You should add code for the constructor and methods in the RouterNode class that is in the RouterNode.java file. You may only communicate with other routers via the sendUpdate() method. You should not add any static member to this class, or by any means get around the requirement that all information must go via sendUpdate().
Other methods in the file are:
| Important note: Your tables should preferably be self-explanatory, and when you demonstrate your code to the lab assistant, you should be able to explain exactly what your tables contain. |
Your solution should implement the poisoned reverse technique. Your solution should also easily allow poisoned reverse switch on/off, such that the system can be compared with and without poisoned reverse (during the demonstartion, for example).
You start the simulator by typing
The simulator starts by initializing each router. A number of windows appear on the screen, one for the simulator output and one for each router node that is initialized, see Figure 3. The title of the window describes what is in it. The graphical user interface is implemented in the file GuiTextArea.java.
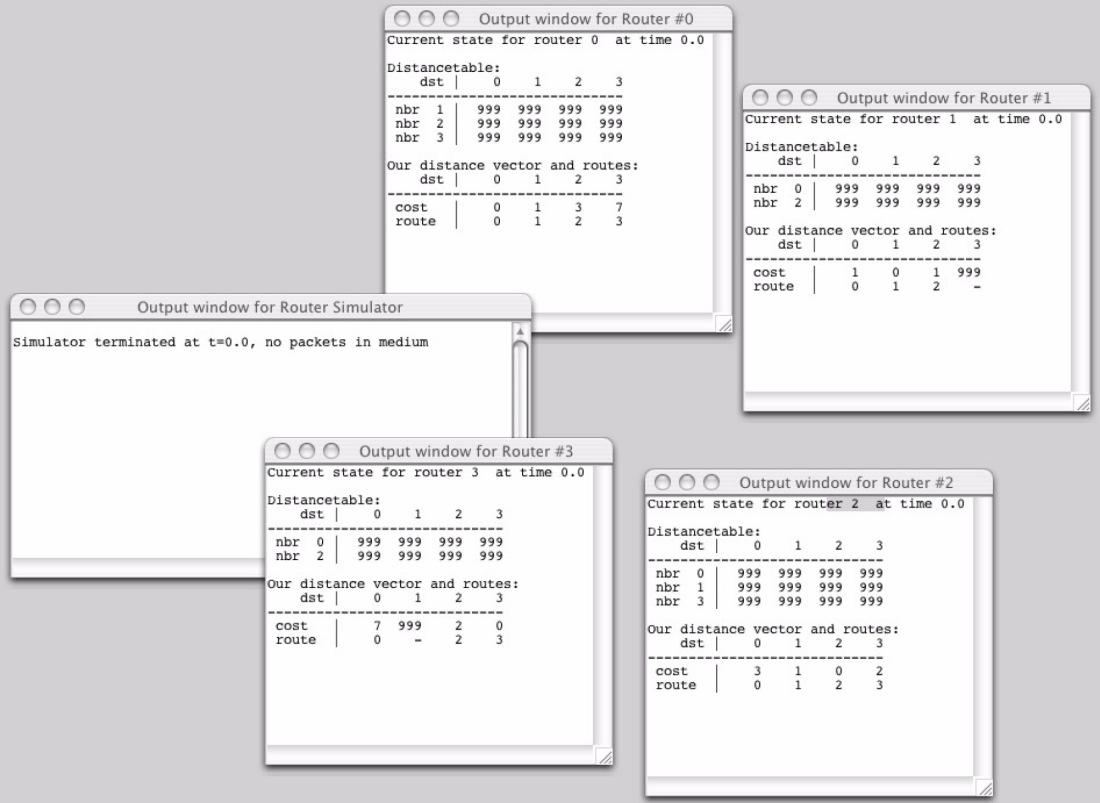 |
| Figure 3: Contents of the screen when simulation starts |
From this starting point, your code, should ensure that updates occur on the network, i.e. routers in the various windows. The simulator will run until the routing tables have converged, i.e. when there are no more messages or events in the system.
You can set the trace level via the command line by DTrace, as you did when you started the simulator above. A trace value of 1 or 2 means that the simulator will print details about what happens internally, such as what happens to packets and timers. A trace value of 0 disables tracking. A value of 2 means that the simulator will show you all possible information that can be useful for debugging your code. Such a nice tracking feature is not available in real networks.
You can also change the seed value for pseudo-random numbers in the simulator. For example, to use a value of 123, you can use -DSeed = 123 as shown:
Using another initial value for pseudo-random numbers gives a different sequence of events for the messages in your network.
| Note: The provided Makefile can be used to facilitate doing this assignment.
For example, entering the following command in the terminal, compiles the files and starts the simulation with
DTrace=3:
% make test
Or you can select among the provided
RouterSimulator classes, which are implemented in
RouterSimulator4.java and
RouterSimulator5.java, by entering either of the following
commands:
% make install4
% make install5
You can examine the Makefile and modify it according to your needs.
|
You should make sure that the network topology or the link costs will not change as a result of running your implementation of the distance vector routing. You can, however, as you will see later in this manual, use events in the RouterSimulator class to study how your algorithm responds to the changes in link costs.
When you demonstrate your solution and/or your TA tests your code, he/she might use other values for the link costs in the topology. You should change the values to test your code more thoroughly only by initializing the data structure connectcosts[][] in the RouterSimulator(), see Figure 4. However, make sure to put the same link costs in both directions on each link, as this assignment only considers symmetric link costs. It is also here that different topologies can be encoded. You can also experiment with new topologies by changing the number of nodes (if required) and initializing the connectcosts[][]array as required. To change the number of nodes, you should modify the value assigned to NUM_NODES in the constructor of the RouterSimulator class.
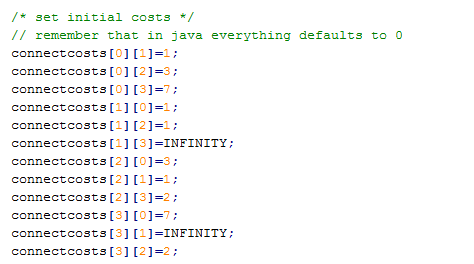 |
| Figure 4: A sample code showing initialization of link costs in the RouterSimulator for the network topology in Figure 1 |
The simulator will never send RouterPacket messages itself. It is your code which must ensure that the information are exchanged between routers in the network.
The RouterNode.java file has a variable called costs which is initialized in the constructor. The simulator sets the link costs associated with a node through the costs variable. For example, in the network shown in Figure 1, the link costs for node 1 is set via the vector {1, 0, 1, RouterSimulator.Infinity} , which means that the cost of the link (from Node 1) to node 0 is 1, to itself is 0, to node 2 is 1, and to node 3 is infinity. Changes in link costs are made by calling the updateLinkCost(), which you should implement.
Costs for all links is set in the constructor for the RouterSimulator class. Further down in that code, two events are added which change the link costs at specific times during the simulation period. The link between eventity and dest changes to cost at time evtime. A sample code for adding such a link cost changing event is shown in Figure 5. Note that the link costs will not change if you do not change the value for the constant LINKCHANGES to true in the beginning of the file. Please change link costs and the events to test your code.
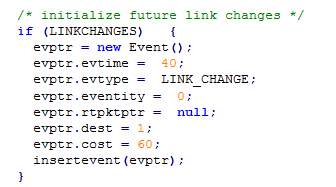 |
| Figure 5: A sample code showing insertion of an event that changes the link cost between Node 0 and Node 1 to 60 at simulation time 40 |
| Note: As a general remark, it is suggested that you use a step-by-step approach for this assignment, such that initially the printDistanceTable() and recvUpdate() methods are implemented and tested using RouterSimulator4.java and RouterSimulator5.java. In the second step updateLinkCost() is implemented along with necessary changes to RouterSimulator.java. At this time you may observe the count-to-infinity problem. In the third step Poisoned Reverse is implemented to address the count-to-infinity problem. |
More information about implementation of distance vector routing can be found in the following RFC:
The "Poisoned Reverse" technique solves the problem with the loops in the network topologies that you test in this lab. Give an example of a topology (e.g. an extension of one of networks in this lab) where the algorithm would not work and explain the reason. Give a solution for this new problem.
To complete this lab you should demonstrate your solution to the TA. Your TA might use topologies other than those two used for this assignment to test your code. Be ready to explain what the printDistanceTable() displays on the screen, and how you have implemented the Poisoned Reverse algorithm.
Make sure you have responded in detail to the supplementary question and use valid sources as references.
Before you demonstrate your solution, give your TA a printed copy of your code (only the code inside the RouterNode.java file) as well as the Makefile.
After your demonstration, you should deliver your report (including the code and the answer to the supplementary question) in a signed IDA lab cover to your TA.