Wireshark Lab: HTTP
|
| This lab assignment is based on "Wireshark Lab: HTTP", by J.F. Kurose, K.W. Ross, available here. It has been prepared by Farrokh Ghani Zadegan, Niklas Carlsson and Carl Magnus Bruhner, and was last updated January 2019 (based on v7.0). |
In this lab you will first need to read through "Wireshark Lab: Getting Started". This document and the exercises in that lab will prepare your for the lab itself. However, note that you do not have to present the deliverables (mentioned in the "Wireshark getting started" pdf), as these are not deliverables for this assignment (and those exercises should only be used as practice).
Second, you will be asked to answer and/or discuss a number of questions. To save time, it is important that you carefully read the instructions such that you provide answers in the desired format(s). The appropriate HTTP traces can be found here (or locally).
We recommend installing Wireshark on your own computer and make your own traffic captures to analyze.
Before you start, please consider the following:
|
|
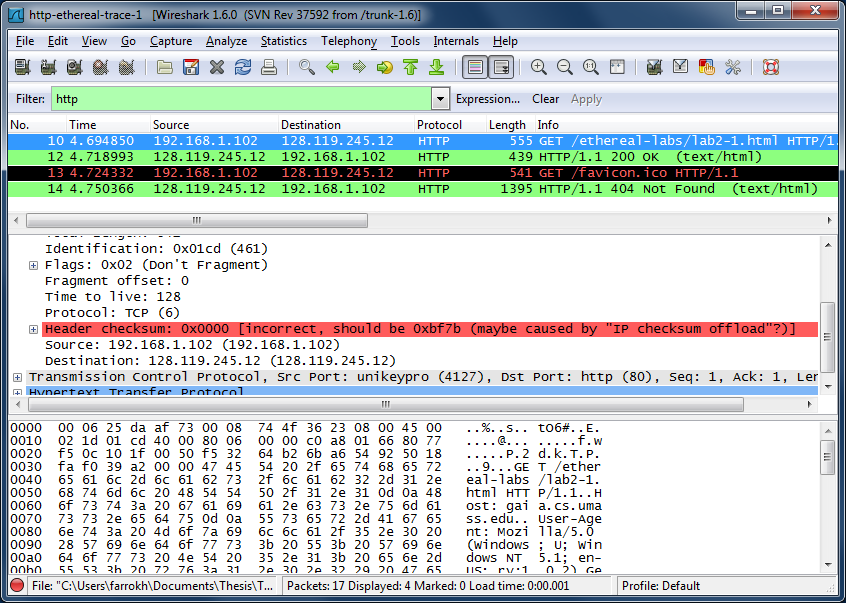
| Figure 1: Wireshark indicating TCP checksum errors |
1. The Basic HTTP GET/response interaction
Let’s begin our exploration of HTTP by downloading a very simple HTML file - one that is very short, and contains no embedded objects. Do the following:
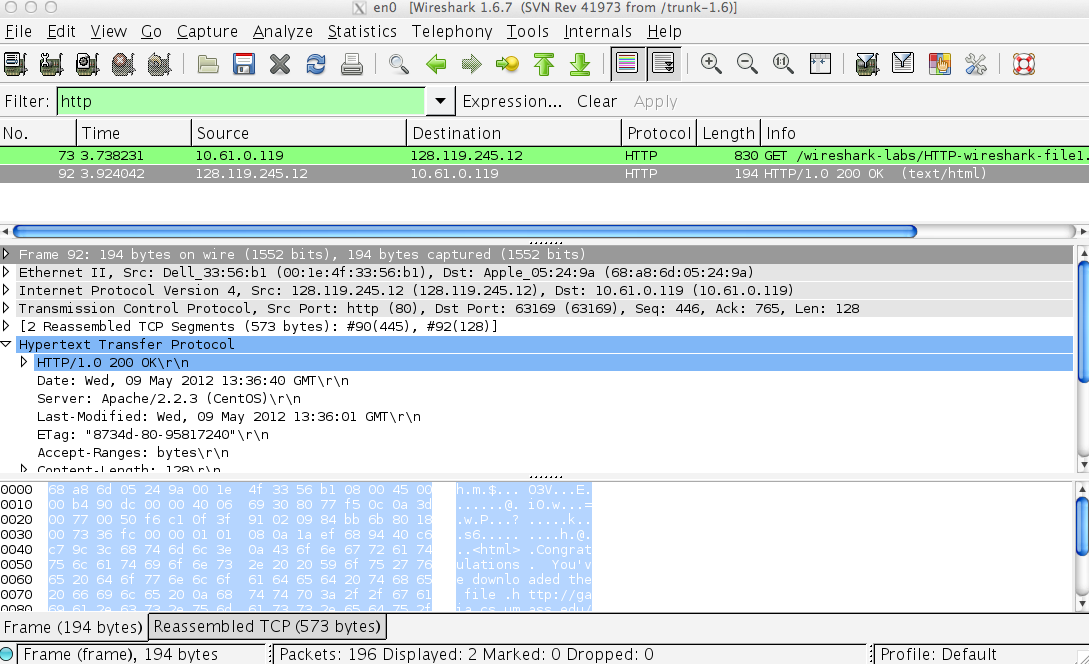 |
| Figure 2: Wireshark Display after http://gaia.cs.umass.edu/wireshark-labs/ HTTP-wireshark-file1.html has been retrieved by your browser |
| (Note: You should ignore any HTTP GET and response for favicon.ico. If you see a reference to this file, it is your browser automatically asking the server if it (the server) has a small icon file that should be displayed next to the displayed URL in your browser. We'll ignore references to this pesky file in this lab.). |
Instructions: By looking at the information in the HTTP GET and response messages, answer the following questions. When answering the following questions, you should print out the GET and response messages (see the introductory Wireshark lab for an explanation of how to do this) and indicate where in the message you’ve found the information that answers the following questions. When you hand in your assignment, annotate the output so that it’s clear where in the output you’re getting the information for your answer. To include the packet data in your own report, you may export the selected packet data as a text file. To do so, use the File->Export->File... window, select file type as Plain text, and choose "Selected packets only". (Note that the export procedure might differ based on the platform on which you are running Wireshark; e.g., macOS, Windows, etc.) Indicate where in the message you’ve found the information that answers the following questions. As for all questions in this course it is important that you clearly indicate what your answer is, how you obtained the answer, and (if applicable) discuss implications/insights regarding your answers. For example, in the questions below, can you elaborate on why you may have observed what you observed?
In your answer to question 5 above, you might have been surprised to find that the document you just retrieved was last modified within a minute before you downloaded the document. That’s because (for this particular file), the gaia.cs.umass.edu server is setting the file’s last-modified time to be the current time, and is doing so once per minute. Thus, if you wait a minute between accesses, the file will appear to have been recently modified, and hence your browser will download a “new” copy of the document.
Task A: For questions 1-7, first write a brief but precise answer for each of the above questions, then write a (combined) paragraph explaining and discussing your observations from the above practice questions. Note that your answer may benefit from explaining and/or referring to some of your observations explicitly.2. The HTTP CONDITIONAL GET/response interaction
Recall from Section 2.2.5 of the text, that most web browsers perform object caching and thus perform a conditional GET when retrieving an HTTP object. Before performing the steps below, make sure your browser’s cache is empty. (To do this under Firefox, select Tools->Clear Recent History, for Internet Explorer, select Tools->Internet Options->Delete File, for Safari, go to Safari->Preferences and activate Show Develop menu in menu bar under the Advanced tab, and then close and select Develop->Empty Caches. These actions will remove cached files from your browser’s cache.) Now do the following:
Practice questions:
3. Retrieving Long Documents
In our examples thus far, the documents retrieved have been simple and short HTML files. Let’s next see what happens when we download a long HTML file. Do the following:
In the packet-listing window, you should see your HTTP GET message, followed by a multiple-packet response to your HTTP GET request. This multiple-packet response deserves a bit of explanation. Recall from Section 2.2 (see Figure 2.9 in the text) that the HTTP response message consists of a status line, followed by header lines, followed by a blank line, followed by the entity body. In the case of our HTTP GET, the entity body in the response is the entire requested HTML file. In our case here, the HTML file is rather long, and at 4500 bytes is too large to fit in one TCP packet. The single HTTP response message is thus broken into several pieces by TCP, with each piece being contained within a separate TCP segment (see Figure 1.24 in the text). In recent versions of Wireshark, Wireshark indicates each TCP segment as a separate packet, and the fact that the single HTTP response was fragmented across multiple TCP packets is indicated by the “TCP segment of a reassembled PDU” in the Info column of the Wireshark display. Earlier versions of Wireshark used the “Continuation” phrase to indicated that the entire content of an HTTP message was broken across multiple TCP segments.. We stress here that there is no “Continuation” message in HTTP! In this regard, Figure 3 shows a screenshot of Wireshark displaying http-ethereal-trace-3 packet trace. In the listing of the captured packets, packet No. 8 shows the HTTP GET request and packet No. 14 shows the corresponding HTTP response. It can be seen that the packets No. 10, 11 and 13 are labeled with “TCP segment of a reassembled PDU”. By clicking on the HTTP response, i.e. packet No. 14, the packet details pane shows [4 Reassembled TCP Segments (4816 bytes): #10(1460), #11(1460), #13(1460), #14(436)] (see Figure 3). Additionally, the packet bytes pane shows a new tab titled Reassembled TCP which shows the entire received HTTP response.
 |
| Figure 3: Wireshark display showing http-ethereal-trace-3 packet trace |
A more convenient way to view the entire data (i.e. all HTTP requests and responses transported in a TCP stream) is using a Wireshark feature called "Follow TCP Streams". By right-clicking on any of the TCP packets associated with a given TCP stream and selecting the "Follow->TCP Stream" menu item, a new window pops up that contains the data exchanged in the selected stream. Figure 4, shows the "Follow TCP Stream" window for the GET /ethereal-labs/lab2-3.html HTTP/1.1 request and its complete associated response. In this window, the non-printable characters are replaced by dots. However, the choice of Raw or ASCII in this window, affects the way you can save the entire stream. That is, if Raw is selected, the stream is saved as a binary file preserving the non-printable characters, whereas in the case of ASCII, the stream is saved as a text file in which the non-printable characters are replaced by dots. Please note how Wireshark has changed (and applied) the display filter to show only the packets in the selected stream.
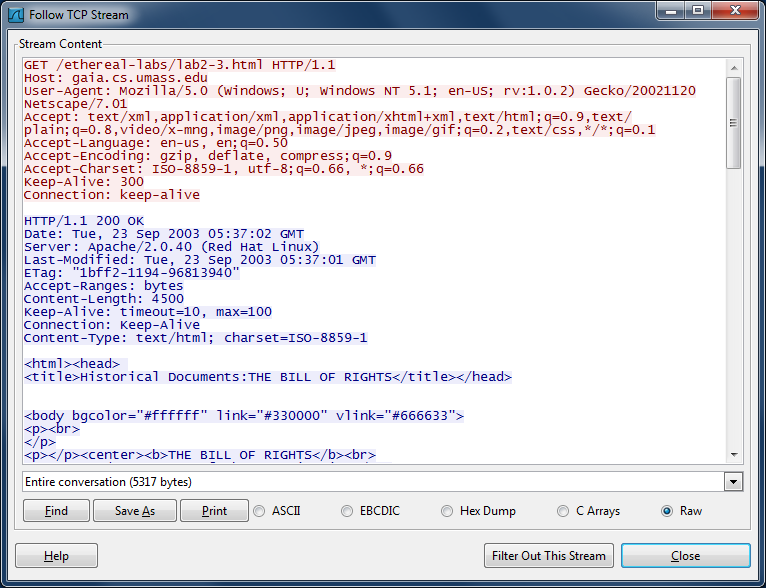 |
| Figure 4: The "Follow TCP Stream" window |
Practice questions:
4. HTML Documents with Embedded Objects
Now that we’ve seen how Wireshark displays the captured packet traffic for large HTML files, we can look at what happens when your browser downloads a file with embedded objects, i.e., a file that includes other objects (in the example below, image files) that are stored on another server(s). Do the following:
Practice questions:
5. HTTP Authentication
Finally, let’s try visiting a web site that is password-protected and examine the sequence of HTTP message exchanged for such a site. The URL http://gaia.cs.umass.edu/wireshark-labs/protected_pages/HTTP-wireshark-file5.html is password protected. The username is “wireshark-students” (without the quotes), and the password is “network” (again, without the quotes). So let’s access this “secure” password-protected site. Do the following:
Practice questions (not to be answered explicitly):
The username (wirehsark-students) and password (network) that you entered are encoded in the string of characters (d2lyZXNoYXJrLXN0dWRlbnRzOm5ldHdvcms=) following the “Authorization: Basic” header in the client’s HTTP GET message. While it may appear that your username and password are encrypted, they are simply encoded in a format known as Base64 format. The username and password are not encrypted! To see this, go to http://www.base64decode.org/ (or any other Base64 decoder of your choice) and enter the base64-encoded string d2lyZXNoYXJrLXN0dWRlbnRz into the "Decode from base64" text box and press "Go". Voila! You have translated from Base64 encoding to ASCII encoding, and thus should see your username! To view the password, enter the remainder of the string Om5ldHdvcms= and press decode. Since anyone can download a tool like Wireshark and sniff packets (not just their own) passing by their network adaptor, and anyone can translate from Base64 to ASCII (you just did it!), it should be clear to you that simple passwords on WWW sites are not secure unless additional measures are taken.
Fear not! As we will see in Chapter 8, there are ways to make WWW access more secure. However, we’ll clearly need something that goes beyond the basic HTTP authentication framework!
6. Preparation questions for Assignment 2*
* Note: Neither question 20 nor Task E is required for TDTS11 students, as they have a different Assignment 2.
Demonstration and Report
For this assignment you will need to write a report that carefully answers questions 1-17 (and 20), as well as provides one paragraph discussing each of the set of questions: 1-7 (task A), 8-11 (task B), 12-15 (task C), 16-17 (task D), and 20 (task E, except for TDTS11 students). Note that each group of questions has a theme and you are expected to convince the reader of your report (including yourself if you were to read the document weeks/months later) that you understand these aspects of HTTP.
Please structure your report such that your answers are clearly indicated for each question (and section of the assignment). It is not the TA's task to search for the answers. Both the questions themselves and the corresponding answers should be clearly stated (and indicated) in your report. Structure your report accordingly. Furthermore, your answers should be explained and supported using additional evidence, when applicable. During the demonstration the TA may ask similar questions to assess your understanding of the lab. You are expected to clearly explain and motivate your answers. As the assignments are done in groups of two, both members of the group will be asked to answer questions.
It is important that you demonstrate the assignment (and discuss your report) with the TA before handing in the report. Also, in addition to having a draft of the report ready, please make sure to open Wireshark and have the trace files ready before calling the TA for the demonstration.
Additional instructions and information about the reports can be found here. Please take this chance to read the guidelines carefully.
A Note on Wireshark Protocol Dissectors
Note: You may find the following hint useful, specially when you use Wireshark to sniff data that is being exchanged between browser and the proxy server you will develop for assignment 2 (not relevant for TDTS11, but it's encouraged to learn more about Wireshark).
Wireshark uses protocol dissectors to extract information from packets. For example, the information shown under the "Hypertext Transfer Protocol" node in the packet details pane in Figure 2 is extracted using the HTTP protocol dissector. Wireshark, however, is not always able to choose the right dissector for a packet. This happens for example, when an uncommon port is used for a common protocol, making Wireshark not able to choose the right type of dissector. Such an example is shown in Figure 5 where a proxy server on port 60000 is used to access web pages. It can be seen from Figure 5 that although the contents of the packets are HTTP data, the protocol is not detected as HTTP.
 |
| Figure 5: Surfing the Web through a proxy server on port 60000 |
Fortunately, it is possible to instruct Wireshark what dissector to use for a given packet. By right-clicking on a packet and selecting "Decode As ...", a window opens which allows assigning the desired protocol dissector to the selected packet, see Figure 6. In the example of Figure 6, after selecting the Transport tab, one can select the HTTP protocol dissector to be used for every packet with the source port of 60000. In the same manner, one can right-click on a packet with the destination port of 60000 and assign the HTTP dissector to it, so that both outbound and inbound packets to and from the proxy server are decoded as HTTP. Please note that such user specified decodes cannot be saved and are lost upon exiting Wireshark.
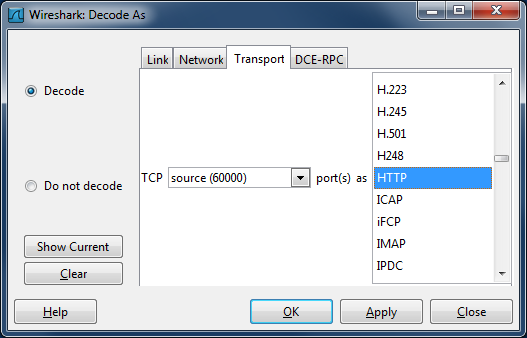 |
| Figure 6: The "Decode As" window |