Distance Vector Routing |
| By Farrokh Ghani Zadegan,
Niklas Carlsson
and Carl Magnus Bruhner. Based on an assignment by Juha Takkinen and originally J.F. Kurose and K.W. Ross. Last updated January 2021. |
Contents
- Overview of the Assignment
- Preliminaries
- What You Should Implement
- Execution of the Simulator
- Link Costs and Events
- Development Strategy
- Beyond Poisoned Reverse
- Reporting
In this assignment, you will work with a simulation of a distributed and asynchronous distance vector routing protocol, based on the Bellman-Ford equation. Your job is to implement a the router node logic, and for this you should (i) design, (ii) implement, (iii) test and (iv) demonstrate a solution. The solution should include the "Poisoned Reverse" technique, which solves the problem of looping in routing topologies. Finally, you should write a lab report according to the instructions.
Important note: The Python version of the lab is new for this year (2021), and there are possibly some un-caught bugs still dwelling in the code. If you happen to stumble upon any such bug, please send me an email (carbr307 @ stud..) and/or inform your laboration assistant so that it can be fixed. The same goes for the Java version, as I've made a few changes to it this year as well. Thanks! /Carl Magnus
Before starting to do the coding for this assignment, you need to:
- carefully read and fully understand how the Distance-Vector Routing Algorithm is implemented and works. (See the course textbook; i.e., Computer Networking: A Top-Down Approach). Also pay special attention to the problem of routing loops (a.k.a. the count-to-infinity problem) in the routing topologies, and to how the poisoned reverse technique solves this problem,
- read through this manual, and
- read the provided source codes to understand how communication takes place between nodes.
The main challenge in this assignment is that your code must be asynchronous. For this assignment you will use an event-driven simulator that manages communication between routers. You should implement the part of the algorithm which is executed in each router. Although routers are active in the same program (simulator), they can only communicate with each other by sending messages through the simulator.
For this assignment you will use the following files (which is either downloaded for Java or Python):
- RouterNode
- RouterSimulator
- RouterPacket
- GuiTextArea
- F
- Makefile (Java only)
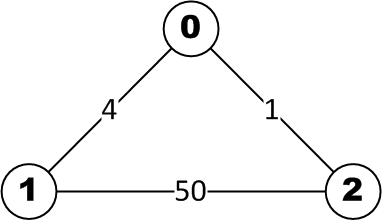
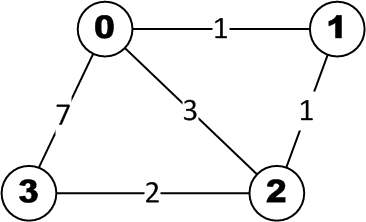
The simulator has three preconfigured simulations that can be used to test your code, with 3, 4 and 5 nodes (Figure 1).
 |
 |
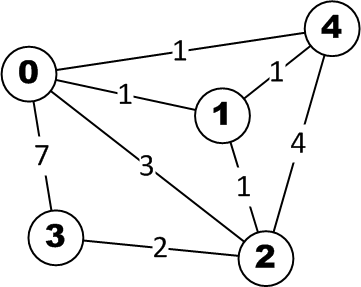 |
| Figure 1: Predefined networks with 3, 4 and 5 nodes in RouterSimulator. | ||
For this assignment, you should only add code to the RouterNode file. For testing your implemented code (in RouterNode), you may use command line arguments to alter the configuration of RouterSimulator. You can use the F class in the F file to perform simple formatted text output.
You should add code for the constructor and methods in the RouterNode class that is in the RouterNode file. You may only communicate with other routers via the sendUpdate() method. You should not add any static member to this class, or by any means get around the requirement that all information must go via sendUpdate(). Moreover, it is not acceptable to use specific values for link costs (such as negative numbers) to signal the other routers to perform an operation.
Other methods in the file are:
- recvUpdate() which is called by the simulator (executed) when a node receives an update from one of its neighbors
- updateLinkCost() which is called by the simulator (executed) when the cost of link of a node is about to change
- printDistanceTable() which is used for debugging and testing of code, and also for demonstration of your solution to the assignment. This method should print the distance vector table (i.e. the routing table) in a format that you and your lab assistant can read and understand (preferably self-explanatory, but you should be able to explain exactly what your table contains to your lab assistant).
You start the simulator by typing (with default configuration):
The simulator starts by initializing each router. A number of windows appear on the screen, one for the simulator output and one for each router node that is initialized, see Figure 2. The title of the window describes what is in it. The graphical user interface is implemented in the GuiTextArea file. In your implementation, in the window of each of the router nodes, the minimum distance vector and route (next hop) to take to reach each of the destinations should be displayed. Optionally, the physical cost to each of the neighbors and the minimum distance vectors received from neighboring nodes can also be shown.
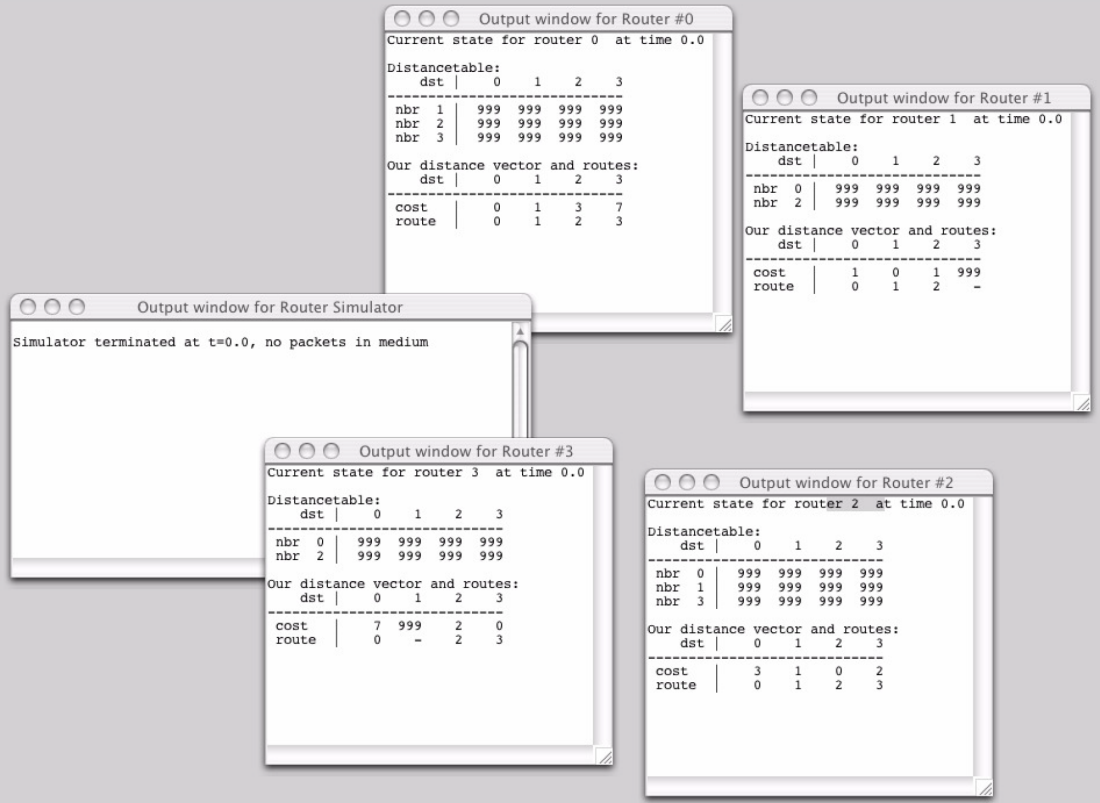 |
| Figure 2: Contents of the screen when simulation starts |
From this starting point, your code should ensure that updates occur on the network, i.e., since the simulator stops as soon as there are no packets being transmitted, your code should be such that as soon as a node is initialized, it sends updates to its neighbors. The simulator will run until the routing tables have converged, i.e., when there are no more messages or events in the system.
The simulator can be configured (default in bold) with link cost change (on/off), number of nodes (3, 4, 5), poison reverse (on/off), seed value for pseudo-random numbers in the simulator (default: 1234), and trace level for debuging (1, 2, 3, 4). At least disabling link cost change and poison reverse, as well as trying different number of nodes, will be useful.
In order to change the values, you can run the programs with command line arguments such as these examples (disabling link cost change and poison reverse, using 4 nodes):
You can select among the provided test configurations test#nc (no changed link costs or poison reverse), test#np (change link costs, but don't use poison reverse) and test#p (change link costs, and use poison reverse) with # being 3, 4 or 5 (number of nodes). This correlates with the recommended development steps.
A useful command is make clobber which deletes the results of previous compilation. Such deletion of .class files ensures that the next make test uses the most recent version of the .java files.
You can examine the Makefile and modify it according to your needs.
You should make sure that the network topology or the link costs will not change as a result of running your implementation of the distance vector routing. You can, however, as you will see later in this manual, use events in the RouterSimulator class to study how your algorithm responds to the changes in link costs.
When you demonstrate your solution and/or your TA tests your code, he/she might use other values for the link costs in the topology. You should change the values to test your code more thoroughly only by initializing the data structure connectcosts[][] in the RouterSimulator(), see Figure 3. However, make sure to put the same link costs in both directions on each link, as this assignment only considers symmetric link costs. It is also here that different topologies can be encoded. You can also experiment with new topologies by changing the number of nodes (if required) and initializing the connectcosts[][]array as required. To change the number of nodes, you should modify the value assigned to NUM_NODES in the constructor of the RouterSimulator class.
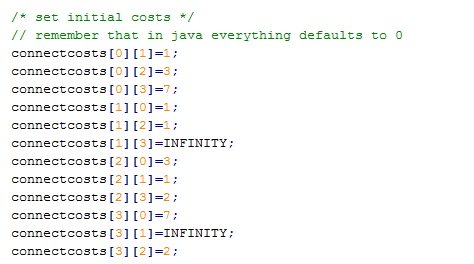 |
| Figure 3: A sample code showing initialization of link costs in the RouterSimulator4 network topology in Figure 1 |
The simulator will never send RouterPacket messages itself. It is your code which must ensure that the information is exchanged between routers in the network.
The RouterNode file has a variable called costs which is initialized in the constructor. The simulator sets the link costs associated with a node through the costs variable. For example, in the second network shown in Figure 1, the link costs for node 1 is set via the vector {1, 0, 1, RouterSimulator.INFINITY} , which means that the cost of the link (from Node 1) to node 0 is 1, to itself is 0, to node 2 is 1, and to node 3 is INFINITY.
Costs for all links are set in the constructor for the RouterSimulator class as was discussed for Figure 3. Further down in that code, two events are added which change the link costs at specific times during the simulation period. The link between eventity and dest changes to cost at time evtime. A sample code for adding such a cost changing event is shown in Figure 4. Note that the link costs will not change if you use -DChange=false (Java) or -c false (Python) to disable the change. You can change link costs and the events to test your code. When a link cost change (which is scheduled by using the above-mentioned events) happens, the simulator notifies the router nodes by calling the updateLinkCost() method, which you should implement.
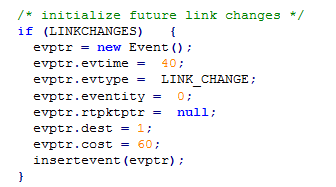 |
| Figure 4: A sample code showing insertion of an event that changes the link cost between Node 0 and Node 1 to 60 at simulation time 40 |
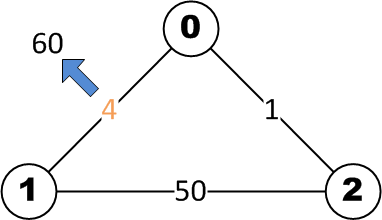
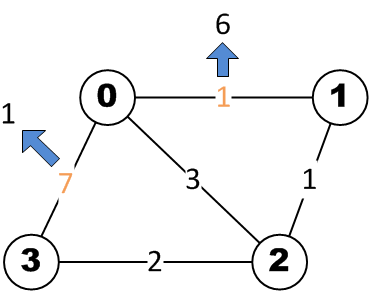
Each of the three copies of the simulator (for the networks illustrated in Figure 1) have at least one link cost changing event scheduled. The following figures show how in each of the topologies link costs change:
 |
 |
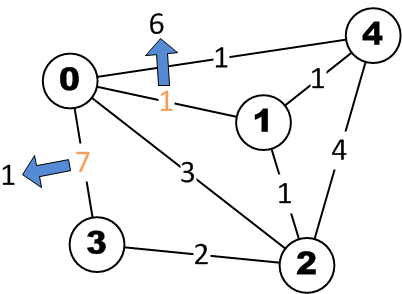 |
| Figure 5: Change of link costs | ||
More information about implementation of distance vector routing can be found in RFCs, such as the following :
as well as in many other online resources, books, and publications.
As a general remark, it is suggested that you take a step-by-step approach for this assignment, such that initially the constructor, the recvUpdate() method, and the printDistanceTable() method are implemented and tested with link cost changes and poison reverse turned off (see instructions for this above). In the second step, updateLinkCost() should be implemented and tested with link cost changes enabled. Start with 3 nodes, where a link cost change is configured to happen at simulation time 40. At this point you will observe the count-to-infinity problem. After this, you may try with 4 and 5 nodes as well and examine the results. In the third step, Poisoned Reverse should be implemented to address the count-to-infinity problem. Your implementation should be such that "poisoning" can be easily enabled and disabled with the command line instructions (i.e. using -DPoison=false (Java) or -p false (Python)).
Remember: You should only modify and hand in the RouterNode file. The other files can be modified for testing purposes, but should not be submitted.
The "Poisoned Reverse" technique solves the problem with the loops in the network topologies that you test in this lab. Give an example of a topology (e.g. an extension of one of networks in this lab) where the algorithm would not work, and explain the reason. Give a solution for this new problem and explain how the problem is resolved by your solution. Even if using solutions proposed in the literature, please use your own words and clearly explain the above issues and solutions.
To complete this lab you should demonstrate your solution to the TA. Your TA might use topologies other than the predefined to test your code. Be ready to explain what the printDistanceTable() displays on the screen, and how you have implemented the Poisoned Reverse algorithm.
You should also write a short report in which you carefully describe and discuss (i) how distance vector routing works, (ii) how you tested the algorithms, (iii) some cases in which poisoned reverse may fail, and (iv) a solution to this problem. Make sure you have responded in detail to the questions above (particularly to those related to bullets (iii) and (iv)) and use valid sources as references.
After your demonstration, you should email your report as well as the RouterNode file to your TA.