Details of Pattern Specification and Installation
Downloading the project:
The jar files and the source for the pattern recognition tool can be downloaded from the following links.
The Java documentation files for the project can found here.
Installing the Pattern Recognition Tool
Before running the pattern recognizer tool, certain extra packages must be installed on the system. As the tool is a Java-based project, a suitable version of Java depending on your platform must be installed.
Installing the C preprocessor (cpp)
The parsing process of Cetus requires the invocation of the C preprocessor (cpp) which should be installed on your system. For the Linux platform, the GCC package could be installed while for the Windows platform, the Cygwin project or the MinGW project can be used. Both the cpp and the Java commands must be accessible from the command line.
Running the tool
Browse to the folder containing the project from the command line and use the following commands to invoke the tool and the analysis package.
• on Linux:
java -classpath cetus.jar:idaprt.jar dsptester.TestcaseRunner ”folder- path”
• on Windows:
java -classpath cetus.jar;idaprt.jar dsptester.TestcaseRunner ”folder- path”
where folderpath is the path for the folder that contains the C source files. The tool then applies the pattern matching algorithm to any file found
in the source folder and analyzes each file by calculating certain measurements . At the end, the tool generates the Results.html file which includes the analysis results for all the files in the source folder. Apart from the analysis results, the tool creates two other folders which include the results from running the application. The cetus output folder contains the new files which have been annotated with various instances of patterns and the non detected folder includes the list of non matched statements in each file.
Including the header files
If any C file chosen for pattern recognition uses any custom library or header files, those files must be put in the same folder as the tool, otherwise the file would not pass the parsing step of the Cetus framework.
Importing the recognition tool in other Java projects: The tool can also be invoked from other java programs by importing the following files in those projects :
cetus.jar
idaprt.jar
PatternDefinition.xml
TargetArchitecture.xml
The tool can then be invoked using the following command:
|
PatternRecognitionTool.execute(filepath);
|
Choosing the target architecture:
The current version of the tool can output the detected patterns to one of the following architectures:
Annotation: The tool replaces the source code corresponding to the recognized level0 or higher level pattern instance with a comment statement generated from that pattern instance.
Viewing the source code: by default the Annotation target architecture hides the source code for level0 and higher level pattern instances. This behavior can be changed by setting the showsourcecode property of the Annotation architecture tag to the value “true”.
Ccode: The tool replaces the source code corresponding to the recognized level1 or level2 pattern instance with a function call statement in C with certain number of specific parameters which are exclusively initialized for that pattern instance.
Switching among different target architectures can be easily accomplished by opening the TargetArchitecture.xml file and modifying the id property of the defaultplatfrom tag. The value of the id property can be choosen among the name of various architectures defined by the architecture tag .
Pattern Structure
Extending the pattern specification file (PatternDefinition.xml) with a new pattern is accomplished through the specification of the XML element corresponding to the new pattern. The XML definition of patterns are based on the elements of the Cetus IR tree so that the recognition tool can easily map the nodes in the program IR to the elements in the XML definition file. We start by defining trivial patterns for the fundamental data types of Cetus such as integer, float, variable and array which are found at the leaf node level as the program Cetus IR is traversed in post-order. The tool then continues the recognition process until it reaches a root of a sub-tree, at this point, the tool tries to map between the whole sub-tree and one of patterns with the help of children patterns and the pattern hierarchy graph. The following sections describe the pattern definition task in detail.
Specifying an XML element for a pattern
For each new pattern an independent pattern XML tag is defined which includes specific properties regarding the name, the structure, the constraints and the output format of that pattern. The following figure describes the general structure of each pattern.
|
|
The definition of each property is as follows:
Name: The name property refers to the selected name of each pattern which must be unique due to its importance in automatic generation of the pattern hierarchy graph (PHG). As a convention, patterns with more than one variations are defined by extending the name of the first variation with a numerical digit. For example, other variations of the MAXVAL pattern have been defined with the names MAXVAL2, MAXVAL3 and etc. The choice for the name of trivial patterns are based on the name of the equivalent type in Cetus to facilitate the comparison between a node in Cetus IR and the XML definition of each pattern .
Example of Trivial patterns: Identifier, ArrayAccess, IntegerLiteral, FloatLiteral
Type: The type property guides the recognition tool to apply a specific way of traversing the IR nodes for the successful recognition process and is set to either Vertical or Horizontal.
Level: The level property refers to the level of the defined pattern in the hierarchy. The valid values for this property are as follows: Trivial, Level0, Level1, Level2.
Structure: The structure tag describes the pattern structure by specifying the type of the sub-tree root node and the list of children patterns on which the current pattern is hierarchically defined. The properties that must be defined in in this tag are as follows:
Operator: the operator property describes the expected structure of the sub-tree based on one of types described in Cetus and can have one of the following values:
|
Type |
Cetus Type Class |
Definition |
|
ASGN |
ASSIGNMENTEXPRESSION |
Represents an assignment expression. |
|
ADD |
BINARYEXPRESSION |
Represent the add operation. |
|
SUB |
BINARYEXPRESSION |
Represent the sub operation. |
|
ADDEQ |
ASSIGNMENTEXPRESSION |
Represents the operations containing the += operator. |
|
SUBEQ |
ASSIGNMENTEXPRESSION |
Represents the operations containing the -= operator. |
|
MUL |
BINARYEXPRESSION |
Represents the multiplication operations. |
|
DIV |
BINARYEXPRESSION |
Represents the division expressions. |
|
MULEQ |
ASSIGNMENTEXPRESSION |
Represents the operations containing the *= operator. |
|
DIVEQ |
ASSIGNMENTEXPRESSION |
Represents the operations containing the /= operator. |
|
MOD |
BINARYEXPRESSION |
Represent the mathematical mode (%) operator. |
|
AND |
BINARYEXPRESSION |
Represents the AND operation. |
|
OR |
BINARYEXPRESSION |
Represents the OR operations. |
|
BEQ |
BINARYEXPRESSION |
Represent the equality ( == ) operator. |
|
BLT |
BINARYEXPRESSION |
Represent the < operator. |
|
BGT |
BINARYEXPRESSION |
Represent the > operator. |
|
BLE |
BINARYEXPRESSION |
Represent the <= operator. |
|
BGE |
BINARYEXPRESSION |
Represent the >= operator. |
|
BNE |
BINARYEXPRESSION |
Represent the != operator. |
|
FunctionCall |
FunctionCall |
Represents the function call statements. |
|
ForLoop |
ForLoop |
Represents any for lop statement. |
|
IFStatement |
IfStatement |
Represents any if statement. |
|
Identifier |
Identifier |
Represents any variable expression. |
|
IntegerLiteral |
IntegerLiteral |
Represents any integer value . |
|
FloatLiteral |
FloatLiteral |
Represents any float value. |
|
ArrayAccess |
ArrayAccess |
Represents any array expression. |
|
PREINC |
UnaryOperator.PRE_INCREMENT |
Represents the pre-increment operator (++ variable) |
|
PREDEC |
UnaryOperator.PRE_DECREMENT |
Represents the pre-decrement operator (--variable). |
|
POSTINC |
UnaryOperator.POST_INCREMENT |
Represents the post-increment operator (variable++). |
|
POSTDEC |
UnaryOperator.POST_DECREMENT |
Represents the post-decrement operator (variable--). |
|
ADRSS |
UnaryOperator.ADDRESSOF |
Represents the & operator. |
|
PONTR |
UnaryOperator.DEREFERENCE |
Represents the pointer operator. |
|
NONE |
- |
Any other operation. |
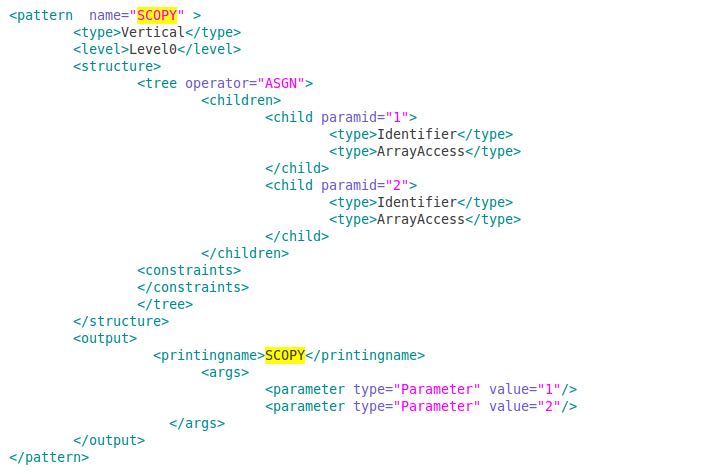
Children: the children tag represents the set of lower level patterns that occur in the structure of this pattern. For example, the SCOPY pattern represents an assignment between two variables which can be defined in the following way:
|
|
The definition expresses that an instance of the SCOPY pattern is detected from a sub-tree which has a root node that matches with the operator “ASGN” and two children, where the first and the second child which map to the left and the right of the assignment must be either a variable or a number. If a pattern is defined on top of all instances of a certain level, the following keywords can be used instead: ALLLEVEL0, ALLLEVEL1, ALLLEVEL2. For example the CONDASS pattern is defined on top of all Level0 patterns, as result, it uses the ALLLEVEL0 keyword when specifying the children pattern.
Constraints: the constraint tag defines a series of rules and restrictions that certain elements of the pattern must follow. The different kind of constraints that currently exist are as follows:
typecheck: the typecheck constraint is used to check the type of a certain pattern element.
rulecheck: the rulecheck constraint is used to check the equality and the non equality of different elements in pattern structure.
namecheck: the nameCheck constraint is used to check the name of functions for patterns such as SIN, COS, TAN and etc.
nomemoryaccess: this constraint is used to check whether a certain variable has been either read or written in a certain block. This constraint is specifically used for horizontal patterns.
indexstructurecheck: the indexstructurecheck constraint is used to check certain restrictions on a index of an array.
ifblock: the ifblock is used to check the occurrence of specific sub-patterns in the then-statement and the else-statement of a pattern in form of an if statement. Examples of these patterns are: MAXVAL, MINVAL, MAXLOCM, MAXVL and etc.
forloopcheck: the forloopcheck constraint is used to check the direction of a for-loop (Ascending, Descending) and its step.
The kind of pattern elements for which these constraints are defined are the children pattern and their sub-children (if they have any). The tool uses a simple format to refer to a pattern child and its sub-children:
Referring to a child : in order to refer to a child (sub-pattern) to define a constraint, we use the numerical order of the child placement in the children tag, for example, in case of the SCOPY pattern, the first and the second child can be referred to by using the string “1” and “2”.
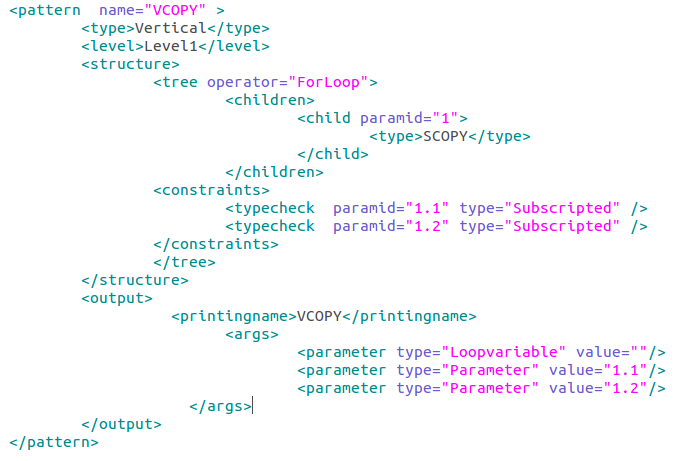
Referring to a sub-child of a child : if one of the children patterns has its own sub-elements, we could refer to any sub-element with a string formatted as “x.x” where the first “x” refers to the numerical order of child node in children tag and the second “x” refers to the numerical order of the sub-children. For example, in case of the VCOPY pattern, the right side of the child pattern SCOPY could be accessed by using the string “1.2” .
Output: the output tag is used to generate the annotation string from the elements of pattern. It has the following structure:
printingname: the printingname tag specifies the actual name of the pattern that is shown in the output. The value of the printingname is usually the same as the name tag of the pattern, however in case of patterns with more than one variation where each has its own unique name, we use the printingname tag to have a consistent name for the annotation string.
Arg: the arg tag is used to specify different set of pattern elements that should occur in the annotation string and can be one of the following types:
Extra : this type is used to print any extra information for the pattern.
Loopvariable: this type is used to include the loop-variable of the Level2 and Level1 patterns in the annotation string.
Parameter: the parameter type is used to include any pattern element in the annotation string.
Allparams: this type is used to include all the children parameters in the annotation string.
Condition: this type is used to include the condition of an if-statement pattern (e.g . CONDASS) in the string annotation.
PatternName: this type is used to include the name of the pattern in the string annotation.
Examples of defining new patterns:
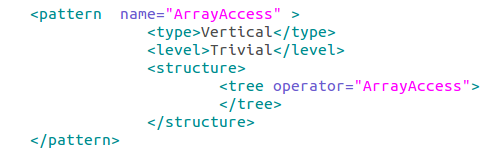
Defining a Trivial pattern: Trivial patterns usually refer to low level concepts and data types for which any programming language has its own keywords. As Cetus provides a unique class to handle any of the C data types, the definition of any trivial pattern is easily accomplished by only choosing the proper operator in the structure tag, for example consider the definition of the trivial ArrayAccess pattern which maps to any instance of an array in the program:
|
|
As seen here, the only necessary step to define this trivial pattern is to set the operator property of the tree tag.
Defining a Level0 pattern: the Level0 patterns represent simple operations which can be easily defined by setting the operator property and specifying the lower level patterns in the children tag. Choosing the right type of operator depends on the nature of that operation, for example as instances of the SCOPY and the SINIT patterns appear as sub-trees with an assignment statement root node, the operator property for these patterns has been set to ASGN which maps to the Cetus AsignmentStatement class. Other examples are: the maxval pattern with the operator property set to IfStatement, or the Add pattern with the operator set to ADD and so on.
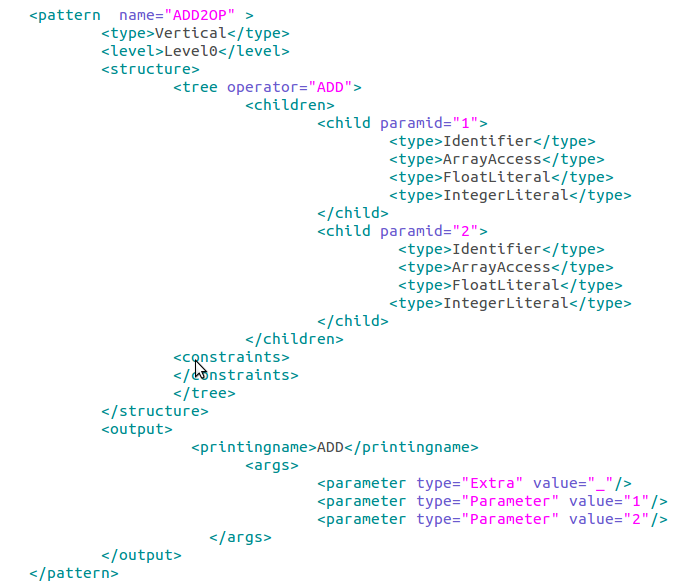
Defining the children patterns: for patterns that are built on top of lower level patterns, the internal structure represented by the children tag should be set by the lower level patterns that occur during the post-order traversal of that pattern. For example consider the following statements which represent different instances of the ADD2OP pattern:
x+y[3];
x+10;
3.5+x;
As this pattern basically represents a + operation between two variables, it would have two children;one for the left side of the operation and one for the right side. As we can see here in the examples, the left and the right side can be either an array, a variable or number which are represented by their own unique trivial patterns, as a result, all the occurring pattern instances of each child node are specified. For example consider the definition of the ADD2OP pattern:
|
|
As seen here, the definition shows that first child ( the left side of the add operation) and the second child can be one of the following patterns: Identifier, ArrayAcess, IntergerLiteral, FloatLiteral.
Defining the output annotation string : The output annotation string is automatically generated from the output tag by using the following formula:
|
annotation-string =printingname + “(“ + parameter1 +”,”+ parameter2 +”,”+ …. + “)” |
In order to include the children patterns or their sub-children in the output , an parameter tag is generated in the following way where the property value refers to the numerical order of that child in the children tag.
|
<parameter type="Parameter" value=""/> |
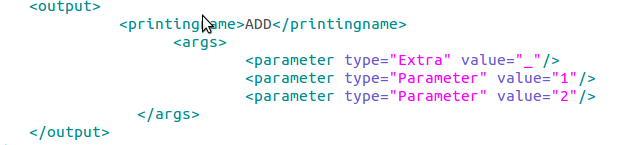
for example, in case of the ADD2OP pattern, the output tag is defined as follows :
|
|
As seen here the first parameter is of type Extra which represents extra information added by the user, the second parameter refers to the first child in the children tag as its value is assigned to “1” and the third parameter refers to second child as its value is assigned to “2”, so for a simple add expression such as x+2.5, the output annotation string will look like as follows:
ADD( _, x,2.5)
Defining a Level1/ Level2 pattern:
The Level1 and Level2 pattern represent a for-loop statement for which certain constraints have been defined. Before getting into the details of pattern definition, certain concepts have to be explained:
Valid for-loop: a for-loop is considered valid if the initialization statement, the condition and the step of the loop exist. For example the following cases of for-loops are considered invalid:
|
// the condition of the for- loop is missing for( i=0 ; ;i++) { x[i]=10 } // the variable initialization statement is missing for(; i<10 ;i++) { x[i]=10; } // the step statement is missing for (i=0 ; i<10) { x[i]=10; } |
Subscripted Variable : an array occurring inside the body of a for-loop is considered as a subscripted variable if at most one of its indices contain the variable over which the for-loop iterates. Assuming that variable I is the loop-variable, an array index can only occur in the formula a*I+b where a and b are can be either an integer or a float value.
Non-subscripted Variable: any scaler variable or an array which has no subscripted index is considered as a non-subscripted variable.
Pattern Definition: The definition of these patterns is accomplished by setting the operator tag to the value ForLoop and the level tag to either Level1 or Level2. For patterns with the ForLoop operator tag, the program calls a certain routine to make sure that this for-loop is valid according to our own convention. The pattern definition continues with specifying the children pattern and certain constraints depending on the pattern.
For example, the definition of the VCOPY pattern is as follows:
|
|
Patterns in form of an if-statement: certain patterns are structured as if-statements, for example consider one definition of the MAXVAL pattern which is as follows:
|
if( a>b) m=a; else m=b; |
As we can see here the whole pattern is defined as an if-statement which can be specified by in the XML pattern tag by setting the operator property of the tree tag to the value “IfStatement”.
Defining the children patterns: as the recognition process traverses an If-statement in post-order, it first tries to match the condition of the if-statement as an instance of a pattern, as a result, the pattern corresponding to the condition of the if-statement must be specified as the first child in the children tag. For example consider the excerpt of the definition of the MAXVAL pattern:
|
|
As seen here, the first child which represents the > or >= operation among two variables will map to the condition of the if-statement.
Skipping the recognition process in the condition: the recognition process in the condition of the if-statement can be skipped by setting the skipcondition property of the children tag to the value “true. The CONDASS pattern is one of the patterns that uses this property.
|
<children skipcondition="true"> |
Defining a help-pattern: In order to define a help-pattern, we simply set the helppattern property of the pattern tag to the value “true” in the following way:
|
<pattern name="" helppattern="true" > |
Typecheck: the typecheck constraint is used to check the type of the children patterns and their sub-elements. In order to add a typecheck constraint in the constraint section of pattern definition, the following tag is used:
<typecheck paramid="" type="" />
where the paramid property refers to the element for which this typecheck constraint is being defined and the type property refers to the expected type an can have one of the following values:
Identifier: checks whether the referred element is a scaler variable.
Vector: checks whether the referred element is an array.
Number: checks whether the referred element is a number.
subscripted:checks whether the referred element is an array which has at most one subscripted index.
Nonsubscripted: checks whether the referred element has no subscripted index.
For example the typecheck constraints specified for the VCOPY pattern are as follows:
|
|
Both typecheck constraints specify that the first sub-child of the scopy child pattern ( the left side of the scopy pattern) and the second sub-child of the the scopy child pattern (the right side of scopy pattern) must be subscripted arrays on the loop-variable of this for-loop.
Rulecheck: the rulecheck constraint is used to check the quality and non-equality of different pattern elements and is defined by using the following convention:
|
<rulecheck type=""> <arg paramid="" /> <arg paramid=""/> </rulecheck> |
The paramid properties refer to the various pattern elements for which the constraint must hold. The type property which specifies the kind of operation to be checked can have one of the following values:
eq: checks the equality of the specified elements.
ne: checks the non-equality of the specified element.
For example, consider the definition of the AADD pattern ( x=x+y):
|
|
As the left side of the assignment must be equal to first element on the right side, two rulecheck constraints have used. The AADD pattern has two children where the first one refers to left side of the assignment and second child refers to the right side which in itself is an instance of the ADD2OP ( x+y) pattern. The first rulecheck constraint used here is as follows:
<rulecheck type="eq">
<arg paramid="1" />
<arg paramid="2.2"/>
</rulecheck>
The first arg tag refers to the left side of the assignment and the second one refers to second child of the ADD2OP pattern (the left side of the add operation).
Comparing two loop-variables: when the rulecheck constraint is defined for two different loop-variables, the program applies a symbolic comparison between the range of the two loop-variables by comparing the lower-bound, the upper-bound and the step defined for both loop-variables. The horizontal variation of the VADDSV is among the patterns that uses this feature.
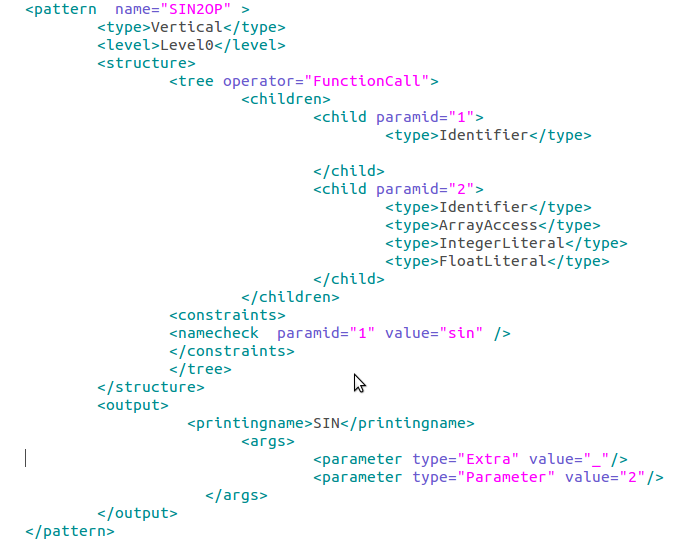
Namecheck: The Namecheck tag is used to check the name of certain functions. Any functions in the program map to the Cetus type FunctionCall. During the bottom-up pattern recognition process, the name of any function would map to an instance of the Identifier pattern, so by using the namecheck constraint we can check whether the name of the function is the expected name according the recognition rule of a specific pattern. For example, to detect the expression sin(x) as an instance of the SIN pattern we have to only check whether the name of the mapped Cetus FunctionCall node is equal to the string “sin”. The definition of the SIN pattern is as follows:
|
|
ifblock: The occurrence of children patterns in the then-statement or the else-statement of an if-statement can be explicitly set by using this constraint which is used for patterns with an if-statement structure such as MAXVAL, MINVAL, MAXLOCM and etc. The ifblock constraint is defined using the following convention:
|
<ifblock> <thenblock> <statement paramid=""/> <statement paramid=""/> </thenblock> <elseblock> <statement paramid=""/> </elseblock> </ifblock> |
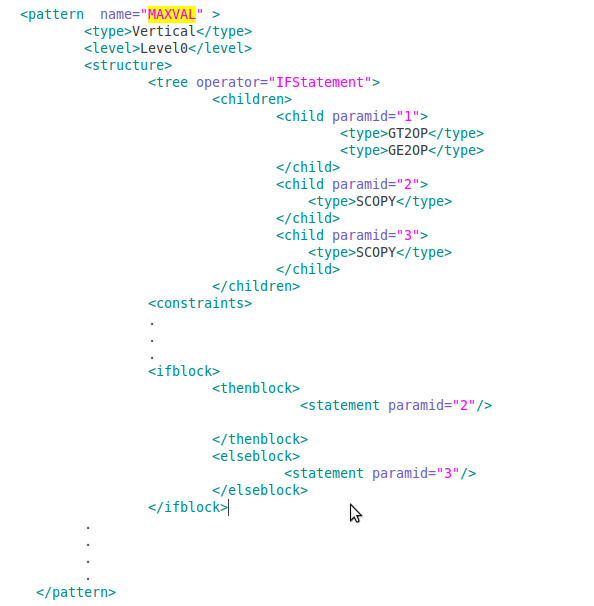
The statement tags refer to the already detected children patterns by their order of occurrence in the children tag and specify whether they should occur in the then-statement (by placing them in the thenblock tag) or in the else-statement ( by placing them in the elseblock tag) For example, consider the ifblock constraint for the MAXVAL pattern:
|
|
Here the ifblock constraint specifies the occurrence of the second child in the then-statement and the occurrence of the third child in the else-statement.
Indexstructurecheck: The indexstructurecheck constraint specifies a specific format for an index in an array, for example consider the definition of the VSHIFT pattern which is as follows:
|
for(i=lb; i<ub; i+=step){ x[i]=x[i+-k];} |
Here, the array x on the right side of the assignment can have an index in the form i+k or i-k which map to pattern instances ADD2OP and ADD2OP2 in our pattern definition list, so by allowing the recognition process to continue in the indices of the arrays and specifying the index format based on one of the already defined patterns, we could bound the array indices to be in specified formats. The indexstructurecheck is defined with the help of the following convention:
|
<indexstructure paramid=""> <indices> <index > <type></type> <type></type> </index> </indices> <indexrulecheck type=""> <arg paramid="" /> <arg paramid=""/> </indexrulecheck> <indexrulecheck type=""> <arg paramid="" /> <arg paramid=""/> </indexrulecheck> </indexstructure> |
The inner elements of the indexstructure tag are as follows:
paramid: the paramid property refers to a child pattern or a sub-child of a child pattern which represents the array for which we want to define a specific index format.
Indices: the indices tag specifies all the indices of an array one by one according to its order of appearance in the array definition. Each index of an array is defined with the help the index tag which has the following structure:
|
<index > <type> </type> . . <type> </type> </index> |
The type tag represents the format of the index and its variation based on one of the already defined patterns. For example if an index of an array can be only an integer or a variable, the following tag can be used:
|
<index > <type>IntegerLiteral </type> <type>Identifier </type> </index> |
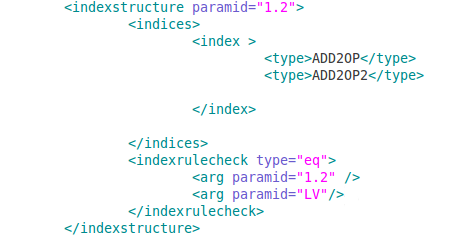
For each index of an array, a specific index tag is added in the indices tag block. For example consider the excerpt of the indexstructure tag defined for the x[i+-k] array of the VSHIFT pattern:
|
|
The array x[i+-k] has only one index for which an index tag element has been specified. As the index of the array can be either in the format i+k (an instance of the ADD2OP pattern) or i-k ( an instance of the ADD2OP2 pattern), two type tags have been used to specify these specific formats based on the defined patterns.
Indexrulecheck : The indexrulecheck has the same structure as the rulecheck constraint but is defined to check the equality of certain index elements. The indexrulecheck is defined using the following format:
|
<indexrulecheck type="eq"> <arg paramid="" /> <arg paramid=""/> </indexrulecheck> |
The arg tags refer to the elements for which the equality constraint has to be checked. The elements can be one of the following types:
Keywords: certain keywords are defined to have direct access to some of the pattern elements, these keywords are as follows:
|
LV |
Refers to the loop-variable of the current sub-tree for-loop. |
|
LV_UB |
Refers to the upper bound of loop-variable of the current sub-tree for-loop. |
|
LV_LB |
Refers to lower bound of the loop-variable of the current sub-tree for-loop. |
The index elements: in order to refer to index elements (and their sub-children) inside the index tag, a string in the format “a” or “a.b” is used where both a and b are numbers. For example consider the following indexstructure tag defined for the x[i+-k] array of the VSHIFT pattern:
|
|
The indexrulecheck tag defined for the VSHIFT pattern checks the equality between the string “1.2” which refers to the second child of either the ADD2OP or the ADD2OP2 pattern ( which is the variable i in case of the x[i+-k] array) and the loop-variable of the for-loop statement which represents this pattern.
The Children pattern elements: in order to refer to one of the children pattern or their sub-children, we use a string in the format “CP_a.b” where variable a and b are numbers. The FIR pattern uses this format to apply certain constraints.
Forloopcheck: the forloopcheck constraint is used to check the direction of a for-loop pattern and its step value. For example in order to check whether a for-loop has an ascending direction with the value of the step being incremented by one in each iteration, we use the following convention:
|
<forloopcheck direction="ASC" stepincrement="1"/> |
Defining a Horizontal pattern: Defining a horizontal pattern can be accomplished in the following steps:
Specifying the type element: The type tag is set to the value “Horizontal”.
Specifying the children: The list of the patterns that can be merged into a horizontal pattern should be added as children inside the children tag.
For a certain block of code, the horizontal recognition process finds all the instances of children patterns defined in the children tag and then checks the specified constraints on each unique set of them. If all constraints hold for this set, all the patterns inside the set are removed from the list of children patterns of that code block and a new blank statement containing the summery of the merged patterns are added at the place of the last horizontal child instance.
Nomemoryaccess Constraint: of all the defined constraints, this specific constraint is used to check the occurrence of the read or write operation for certain variable in between two statements and is defined using the following constraint:
|
<nomemoryaccess paramid="" type="" startpoint="" endpoint=""/> |
The definition of elements inside this tag is as follows:
paramid: refers to the variable for which the memory access operation has to be checked.
type: refers to the type of memory operation which has one of the two values of Read or Write.
Startpoint : refers to the starting statement from which the specified memory operation should be checked.
endpoint: refers to the ending statement to which the specified memory operation has to be checked.
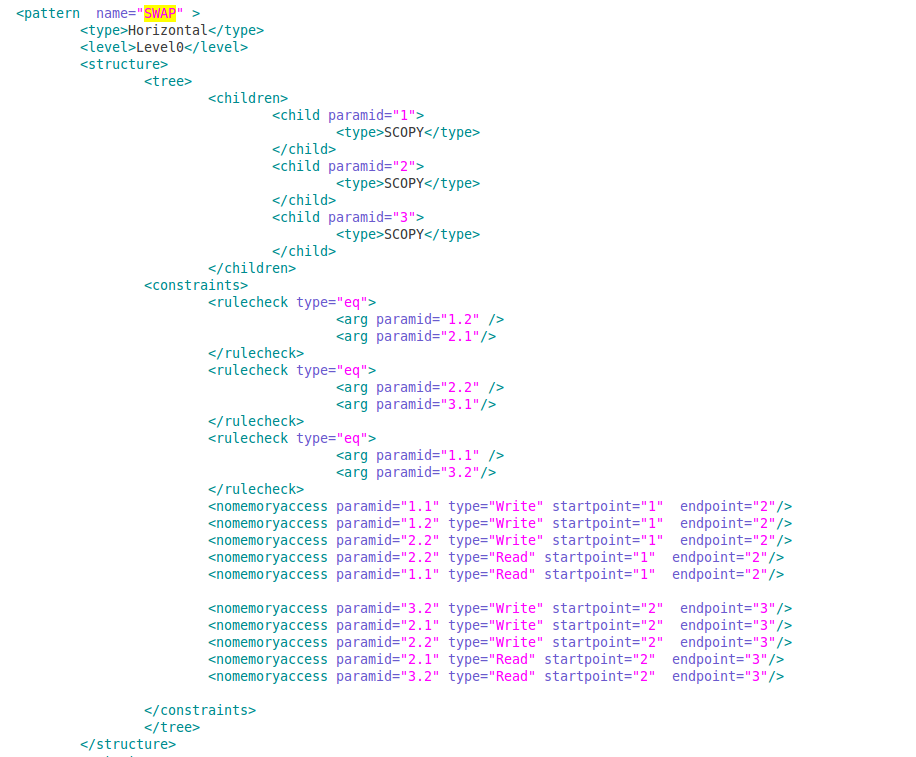
An Example: the horizontal swap pattern tries to merge some assignment statements which have the following conditions:
|
x=y; \\statement 1 …..... y=z; \\ statement 2 ….. z=x; \\ statement 3 |
As seen here, the value of variable y has been swapped with the value of variable z. This three assignments can be replaced with an instance of the swap pattern under the following conditions:
No read or write operations occur for variables x, y, z in between statements 1 and 2.
No read or write operations occur for variables x, y, z in between statements 2 and 3.
The definition of the structure and constraints of the swap pattern is as follows:
|
|
Extending the recognition tool to handle complex patterns:
While the specified XML based pattern definition syntax can be used to specify a large number of new patterns, there still exist certain complicated patterns which require unique constraints. Our tool allows manual specification of recognition rules with the help of an auxiliary class which is done in the following steps:
Using the hascustommatchingrule property: by adding the hascustommatchingrules property to the structure tag and setting its value to the string “true”, we can notify the tool that this specific pattern must use an auxiliary class to handle the recognition process.
Defining the auxiliary class: The auxiliary pattern class is created by creating a new class which inherits the IpatternComparable interface. For each new pattern that requires specific constraint checking a function with the following format is added to the class. As we can see here, the name of this function is the combination of the name of the pattern and the string “Compare”. During the recognition process, the matching module invokes the suitable compare function based on its name from this class.
|
public static boolean PatternNameCompare (PatternStructure pattern,Traversable subtreeRoot,ArrayList<MatchedInstance> patternList) { } |
Passing the new auxiliary class to the recognition process: By importing the idaprt.jar file in our project and passing the newly auxiliary class using the following function we can override the matching module compare function and force it to use the auxiliary class for pattern recognition.
|
AuxiliaryRecognitionModule.setCustomUserConstraint(AuxiliaryClass); |